> ## Documentation Index
> Fetch the complete documentation index at: https://docs.partnero.com/llms.txt
> Use this file to discover all available pages before exploring further.
# Integrate Razorpay
This guide will walk you through the steps to integrate Partnero with Razorpay payments to track referral visits, capture sign-ups, and monitor sales.
These instructions can also be found on your Partnero account, under **Integration** > **Guides** tab > **Razorpay**: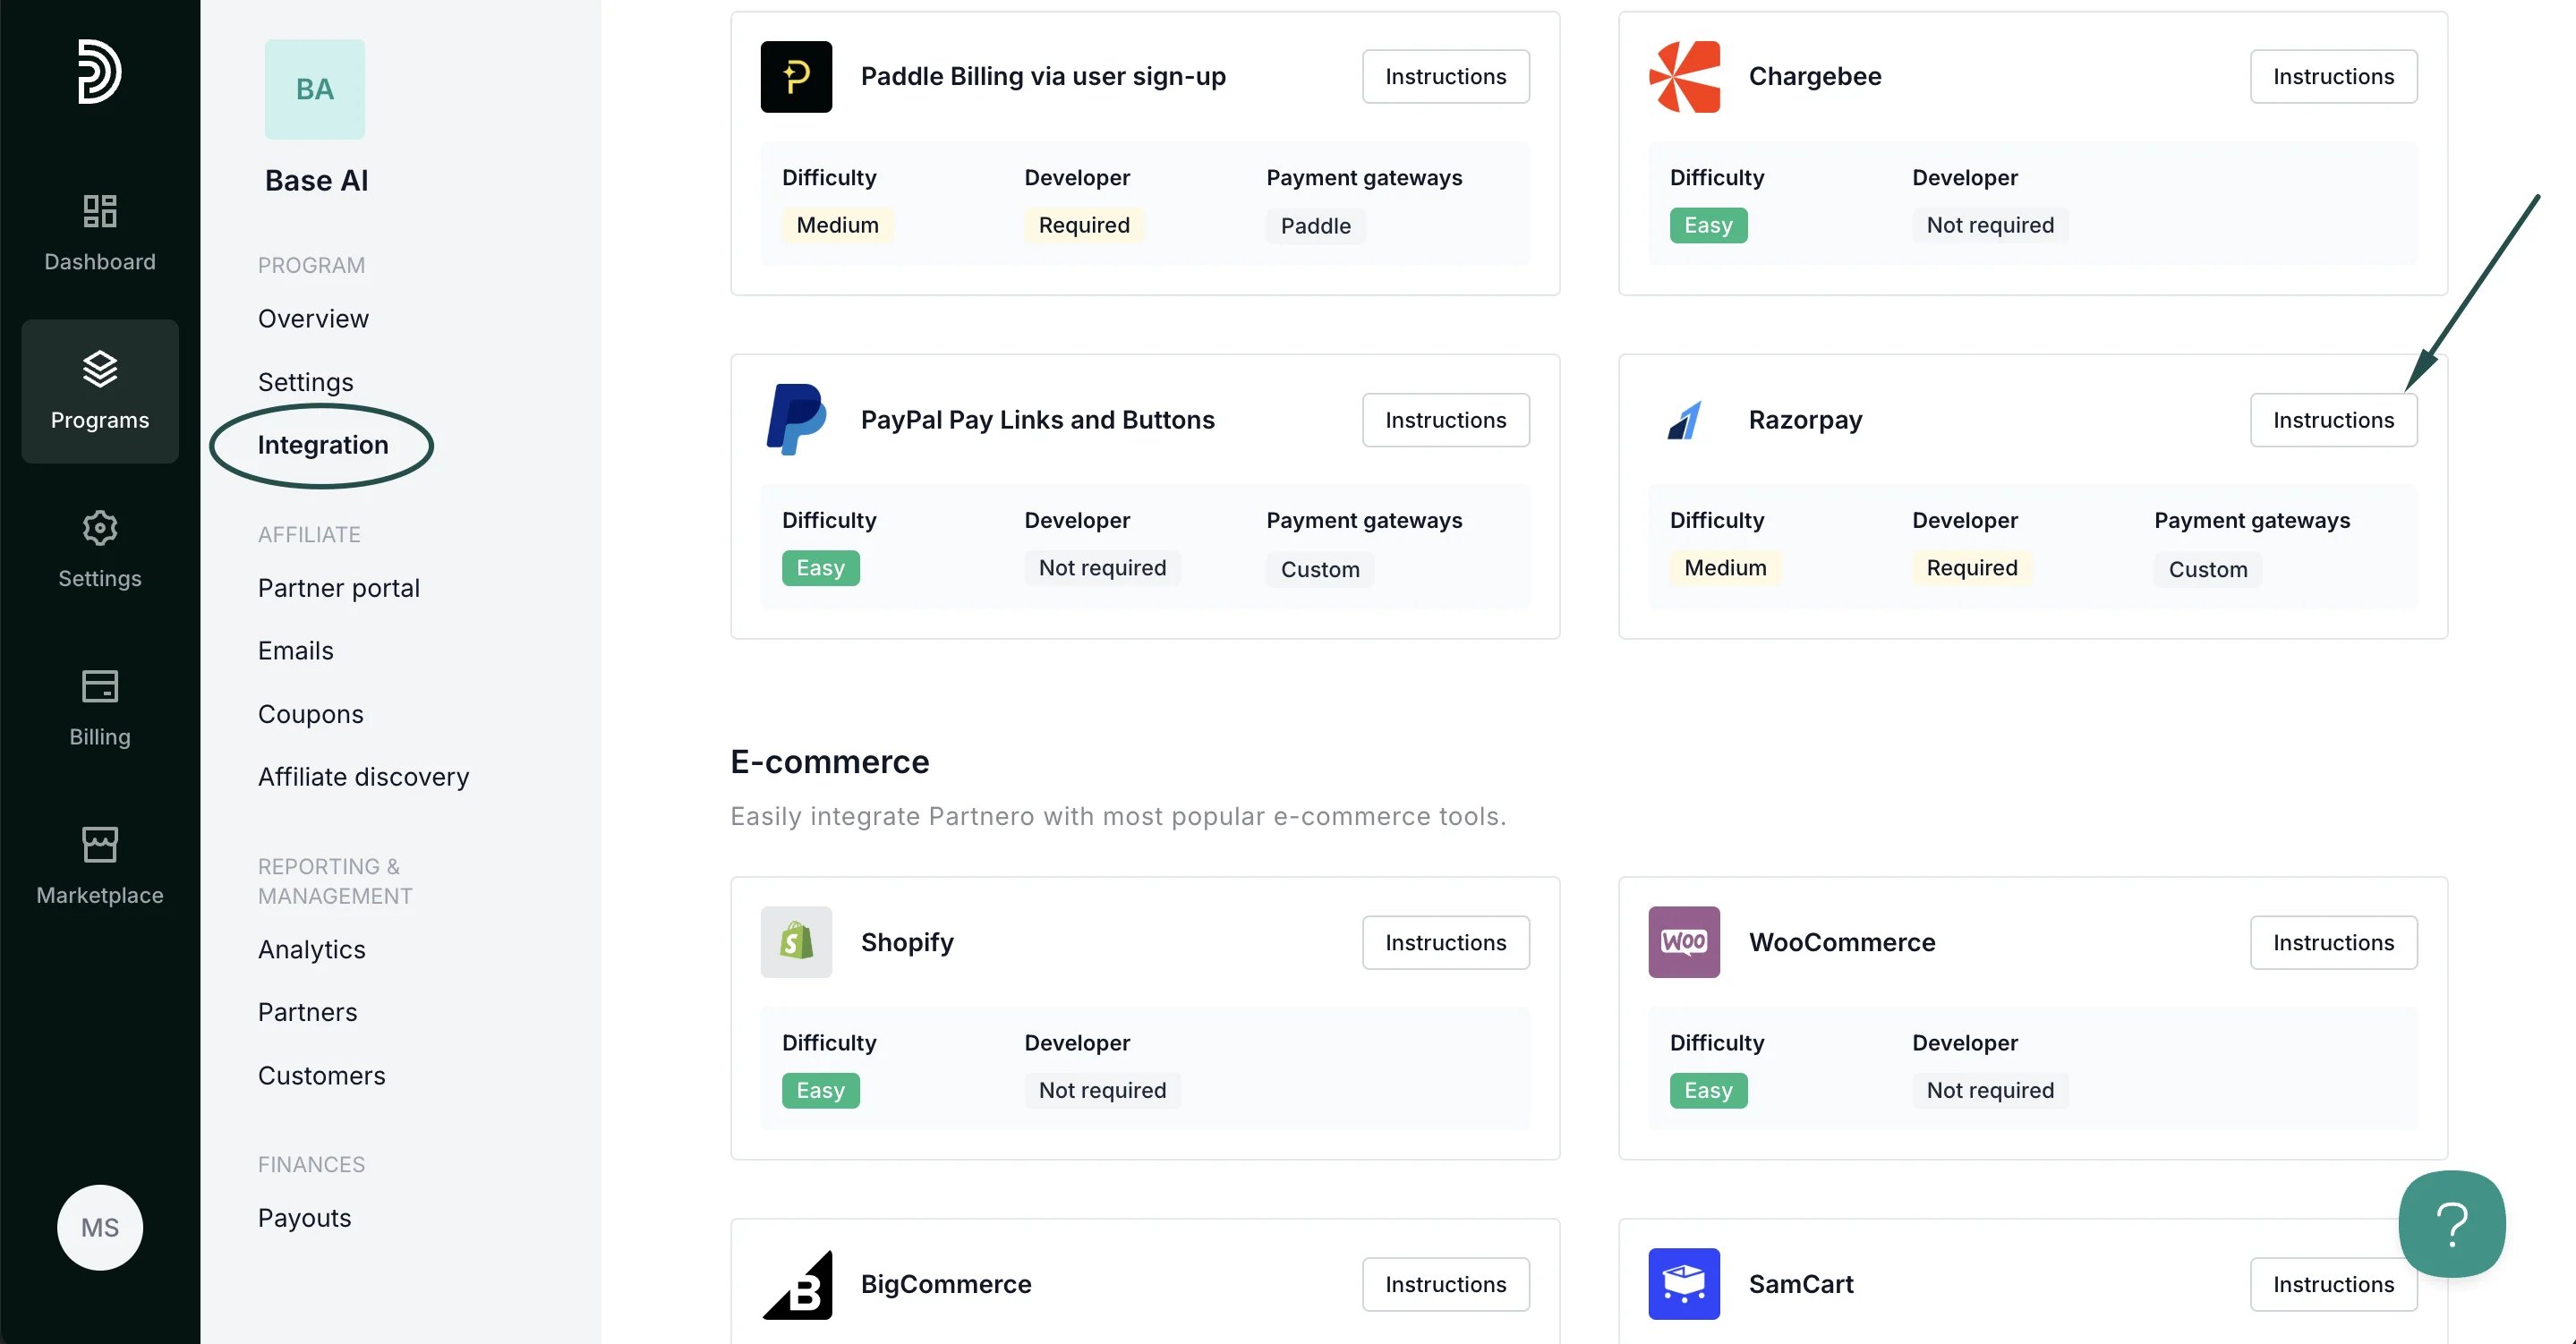 ***
### Step 1: Start tracking website visitors
To track visitors on your website, you need to install the PartneroJS snippet as custom code.
#### Install the PartneroJS Snippet
1. Open the program you'd like to integrate and go to **Integration** > **Guides** tab > **Razorpay**. Click **Instructions**.
2. Copy the PartneroJS snippet:
***
### Step 1: Start tracking website visitors
To track visitors on your website, you need to install the PartneroJS snippet as custom code.
#### Install the PartneroJS Snippet
1. Open the program you'd like to integrate and go to **Integration** > **Guides** tab > **Razorpay**. Click **Instructions**.
2. Copy the PartneroJS snippet: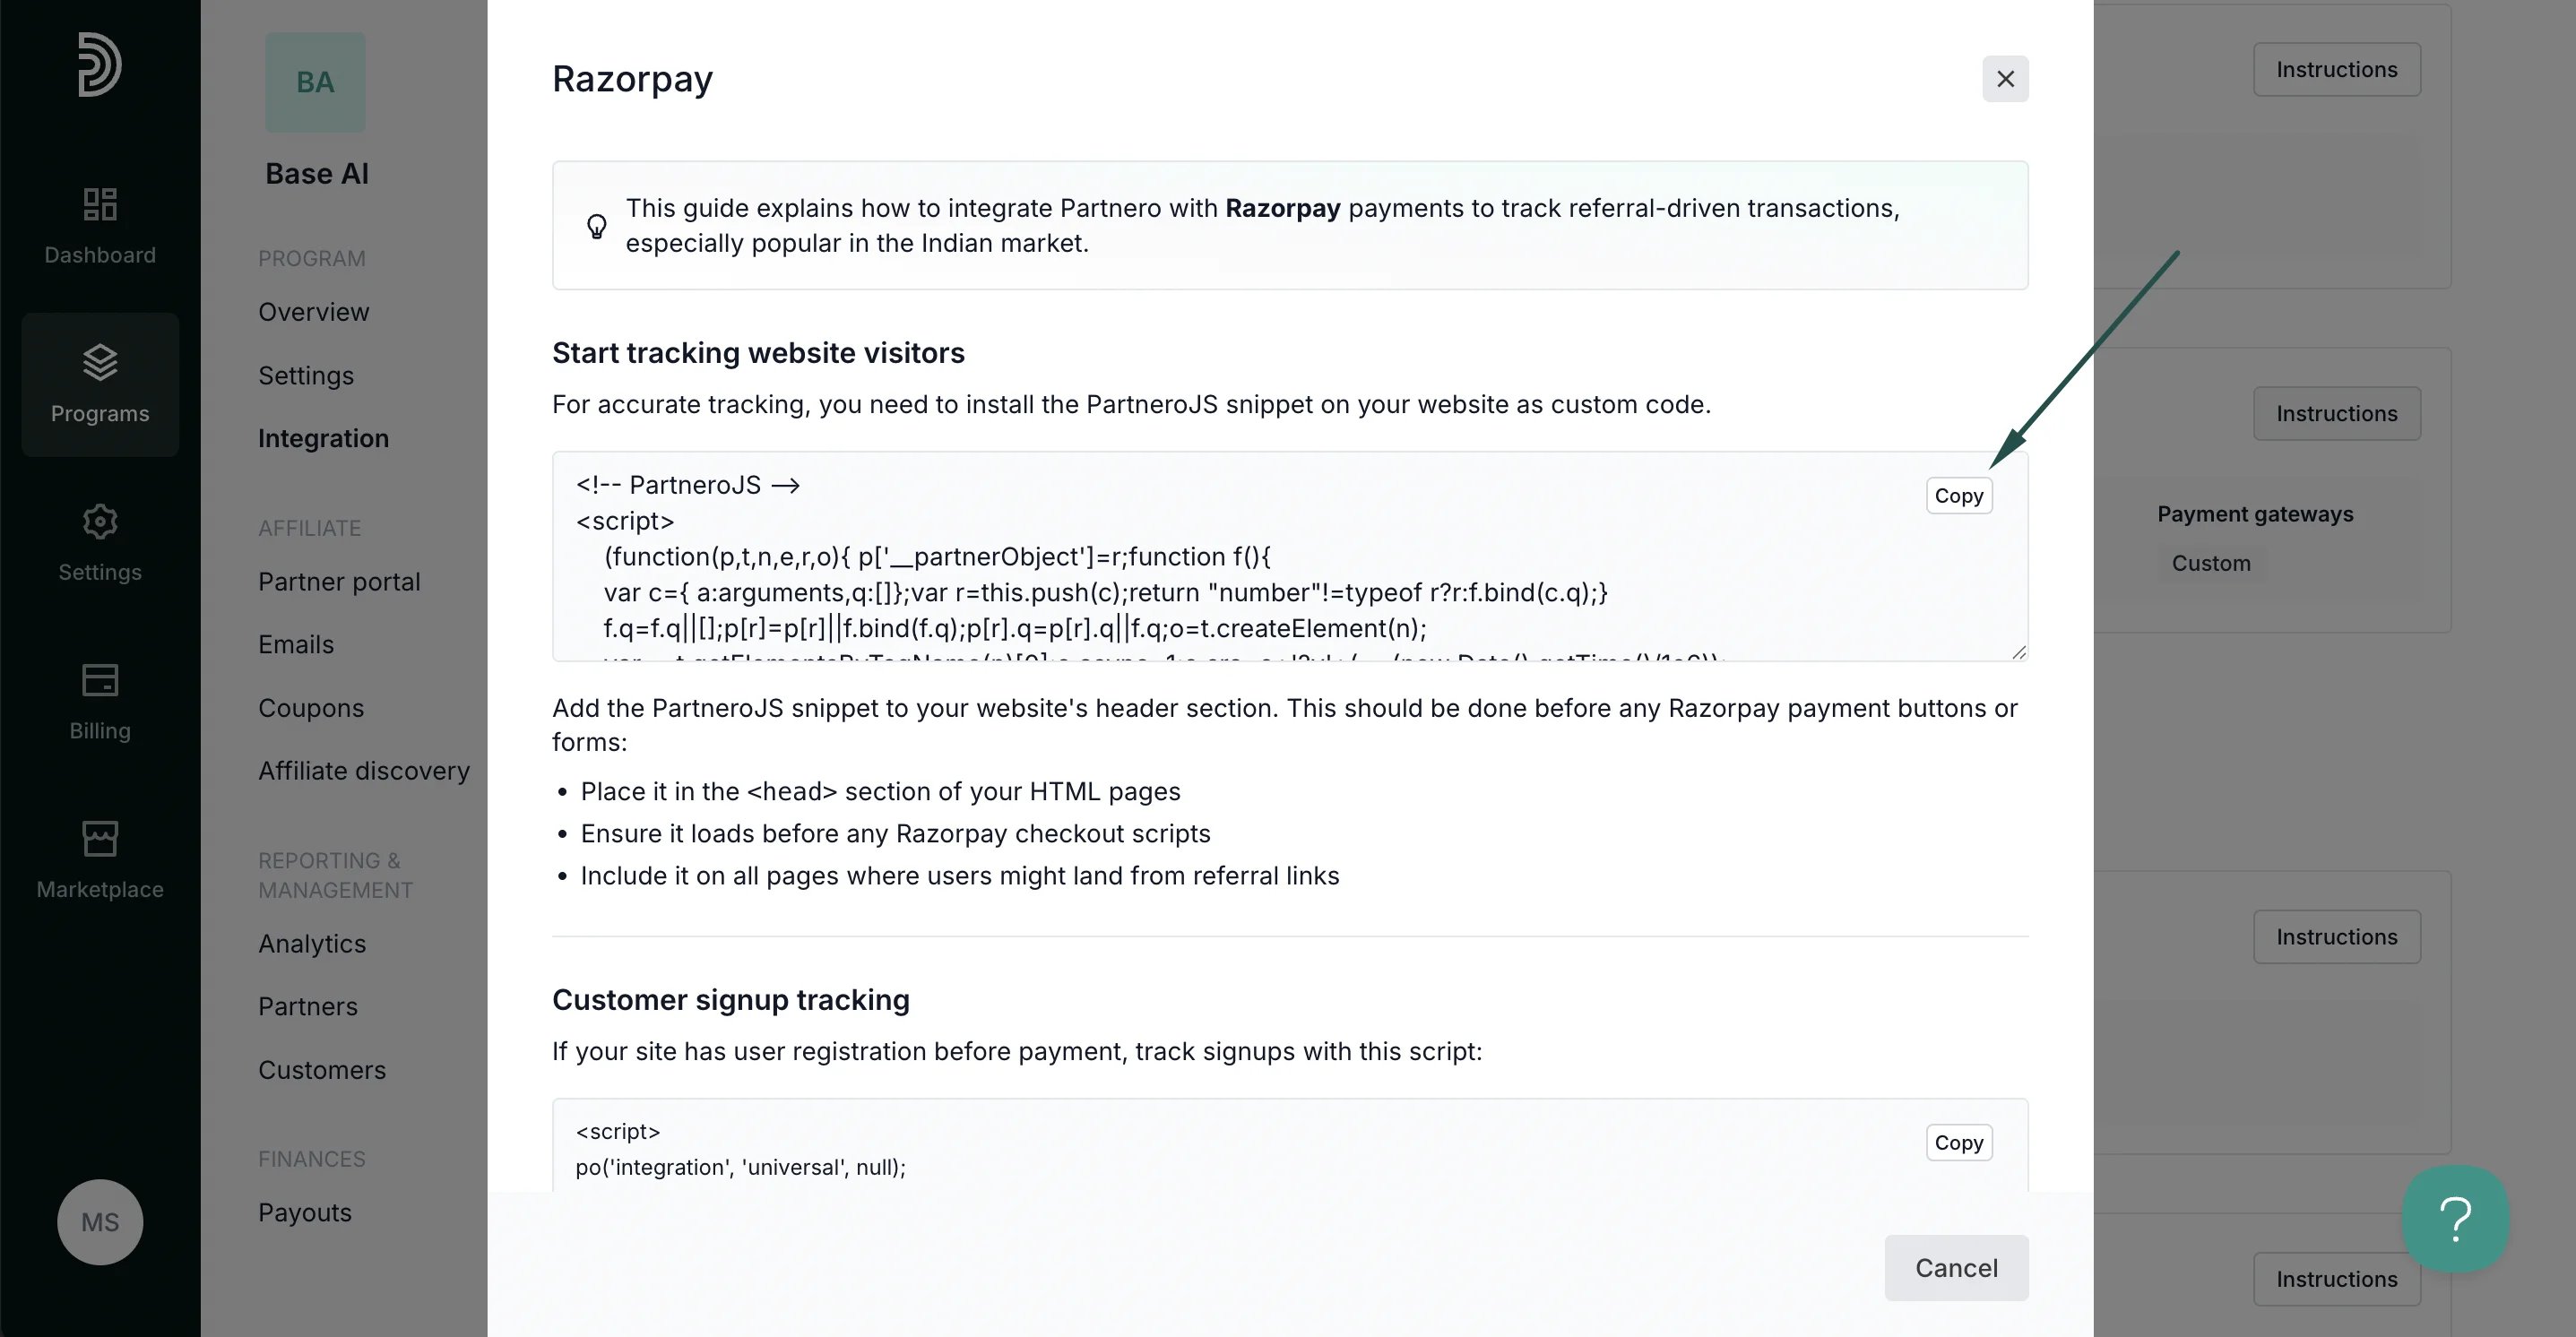 3. Add the PartneroJS snippet to your website's header section. This should be done before any Razorpay payment buttons or forms:
* Place it in the `` section of your HTML pages
* Ensure it loads before any Razorpay checkout scripts
* Include it on all pages where users might land from referral links
***
### Step 2: Track customer signups
If your site has user registration before payment, you can track customer signups using the signup tracking snippet. Copy the snippet from the integration guide:
3. Add the PartneroJS snippet to your website's header section. This should be done before any Razorpay payment buttons or forms:
* Place it in the `` section of your HTML pages
* Ensure it loads before any Razorpay checkout scripts
* Include it on all pages where users might land from referral links
***
### Step 2: Track customer signups
If your site has user registration before payment, you can track customer signups using the signup tracking snippet. Copy the snippet from the integration guide: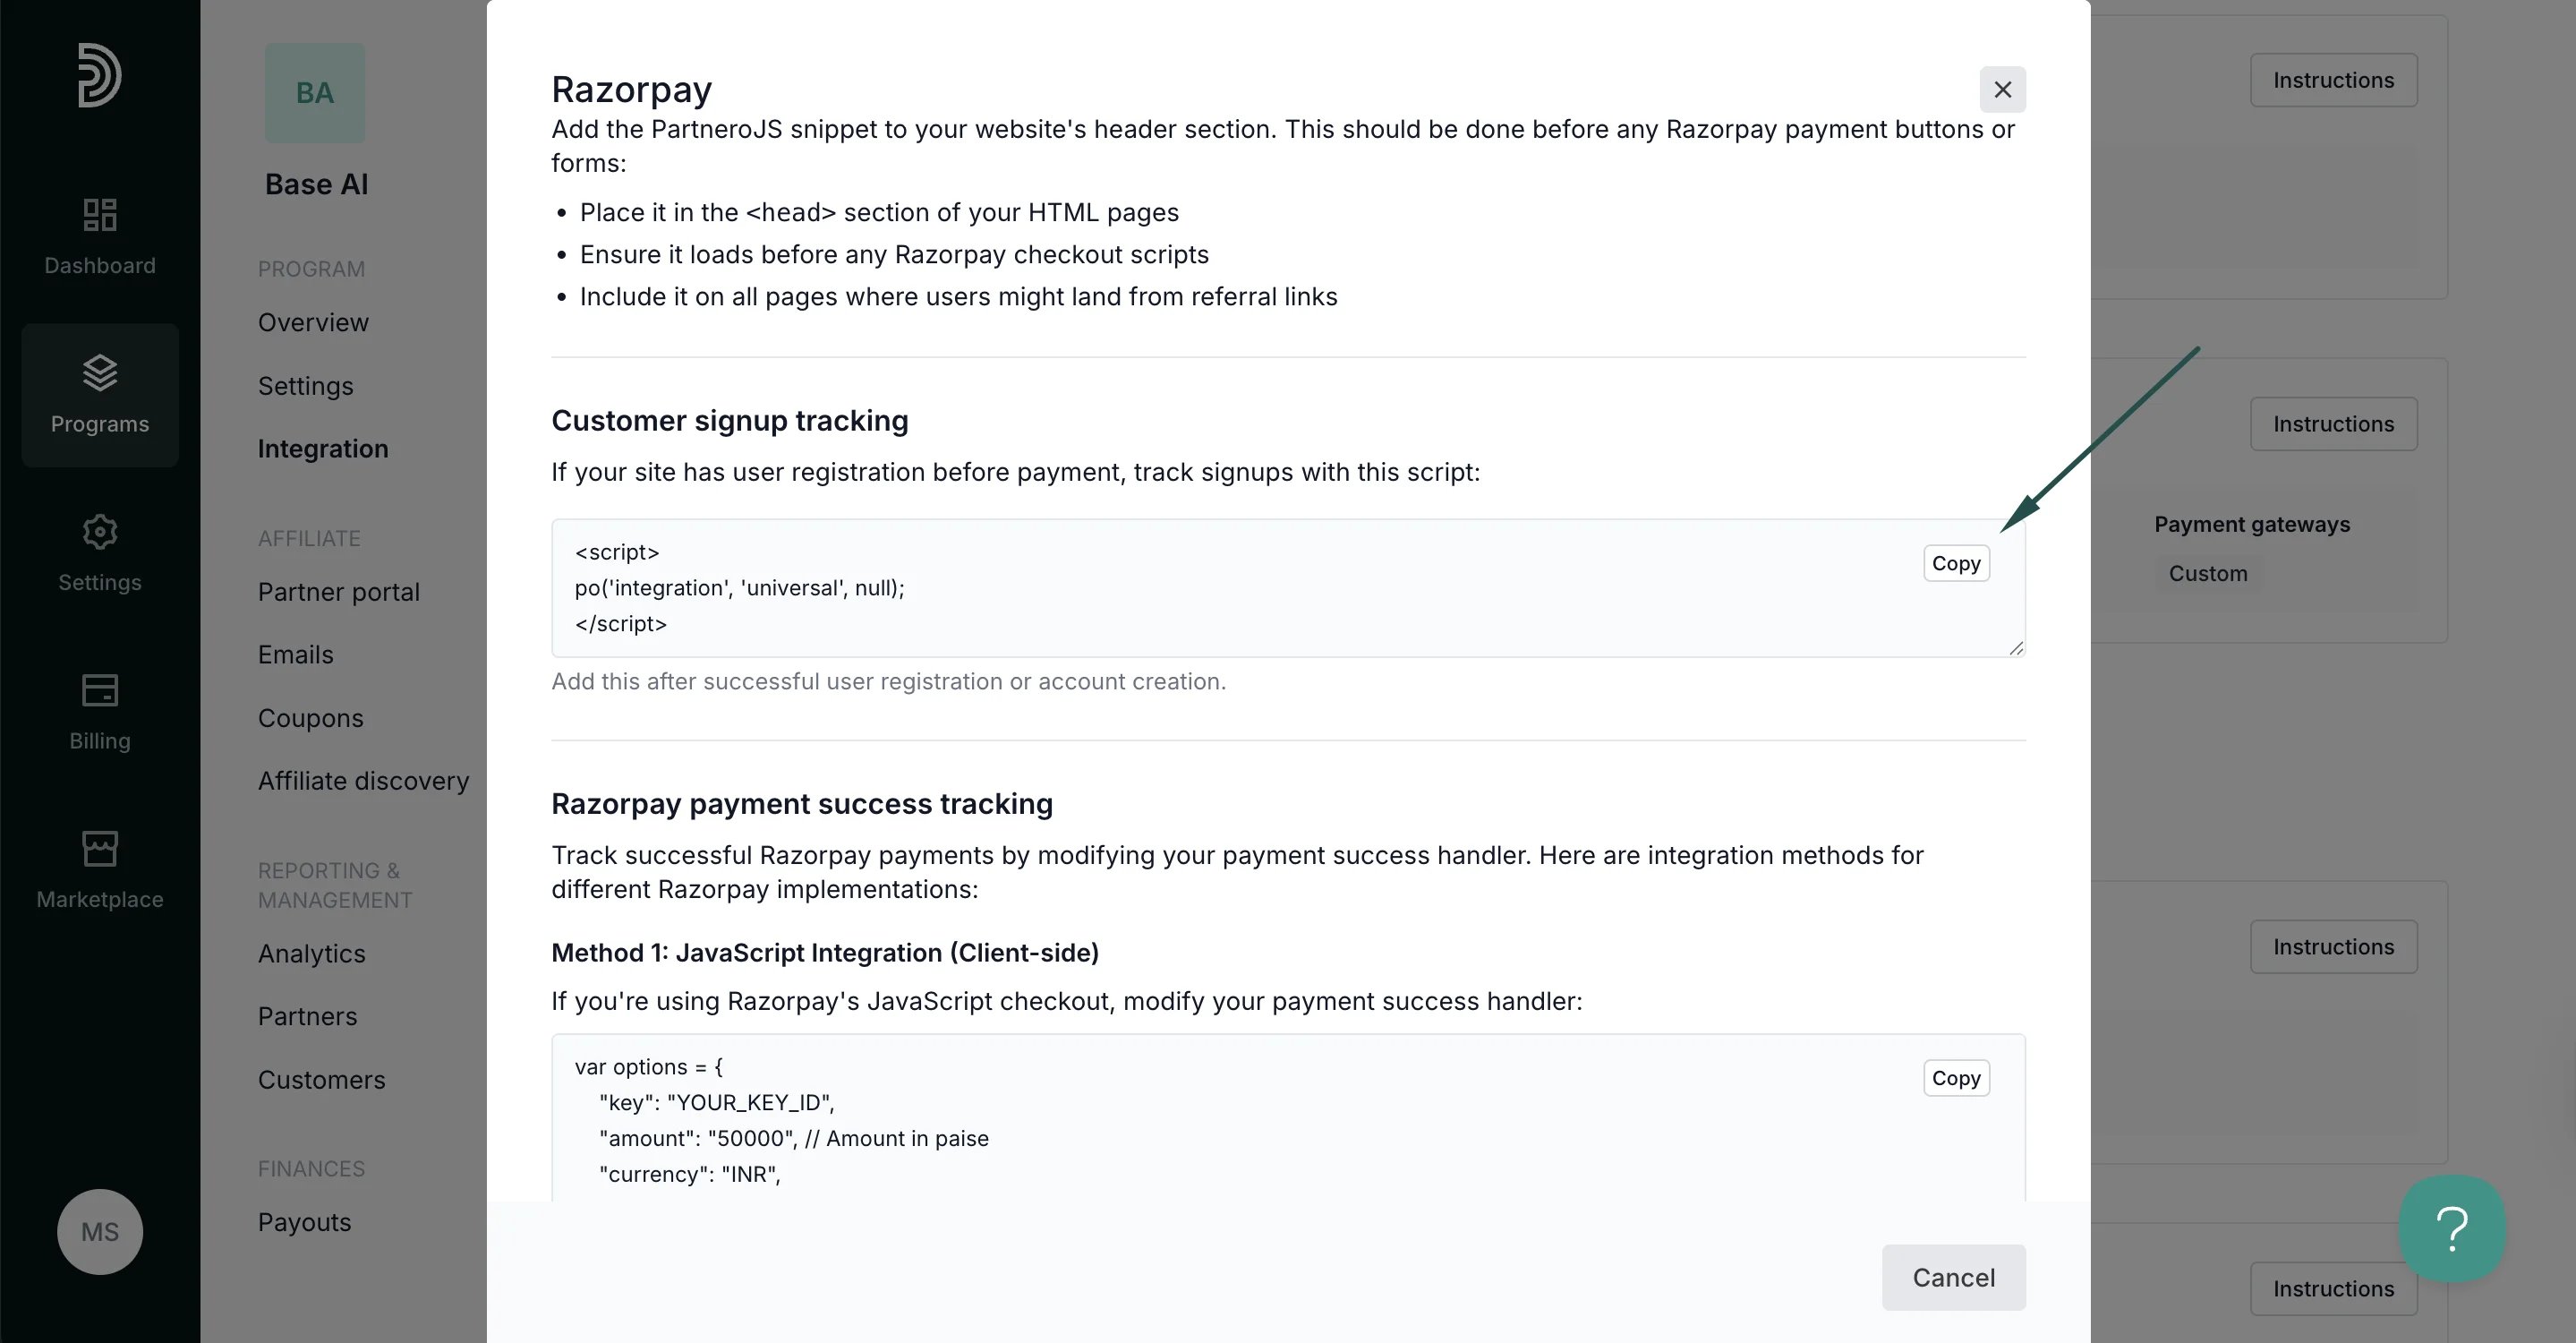 Paste the script to your website after successful user registration or account creation.
***
### Step 3: Track customer payments
You can successful Razorpay payments by modifying your payment success handler. There are integration methods for different Razorpay implementations.
#### Method 1: JavaScript Integration (Client-side)
If you're using Razorpay's JavaScript checkout, modify your payment success handler using the provided code snippet:
Paste the script to your website after successful user registration or account creation.
***
### Step 3: Track customer payments
You can successful Razorpay payments by modifying your payment success handler. There are integration methods for different Razorpay implementations.
#### Method 1: JavaScript Integration (Client-side)
If you're using Razorpay's JavaScript checkout, modify your payment success handler using the provided code snippet:
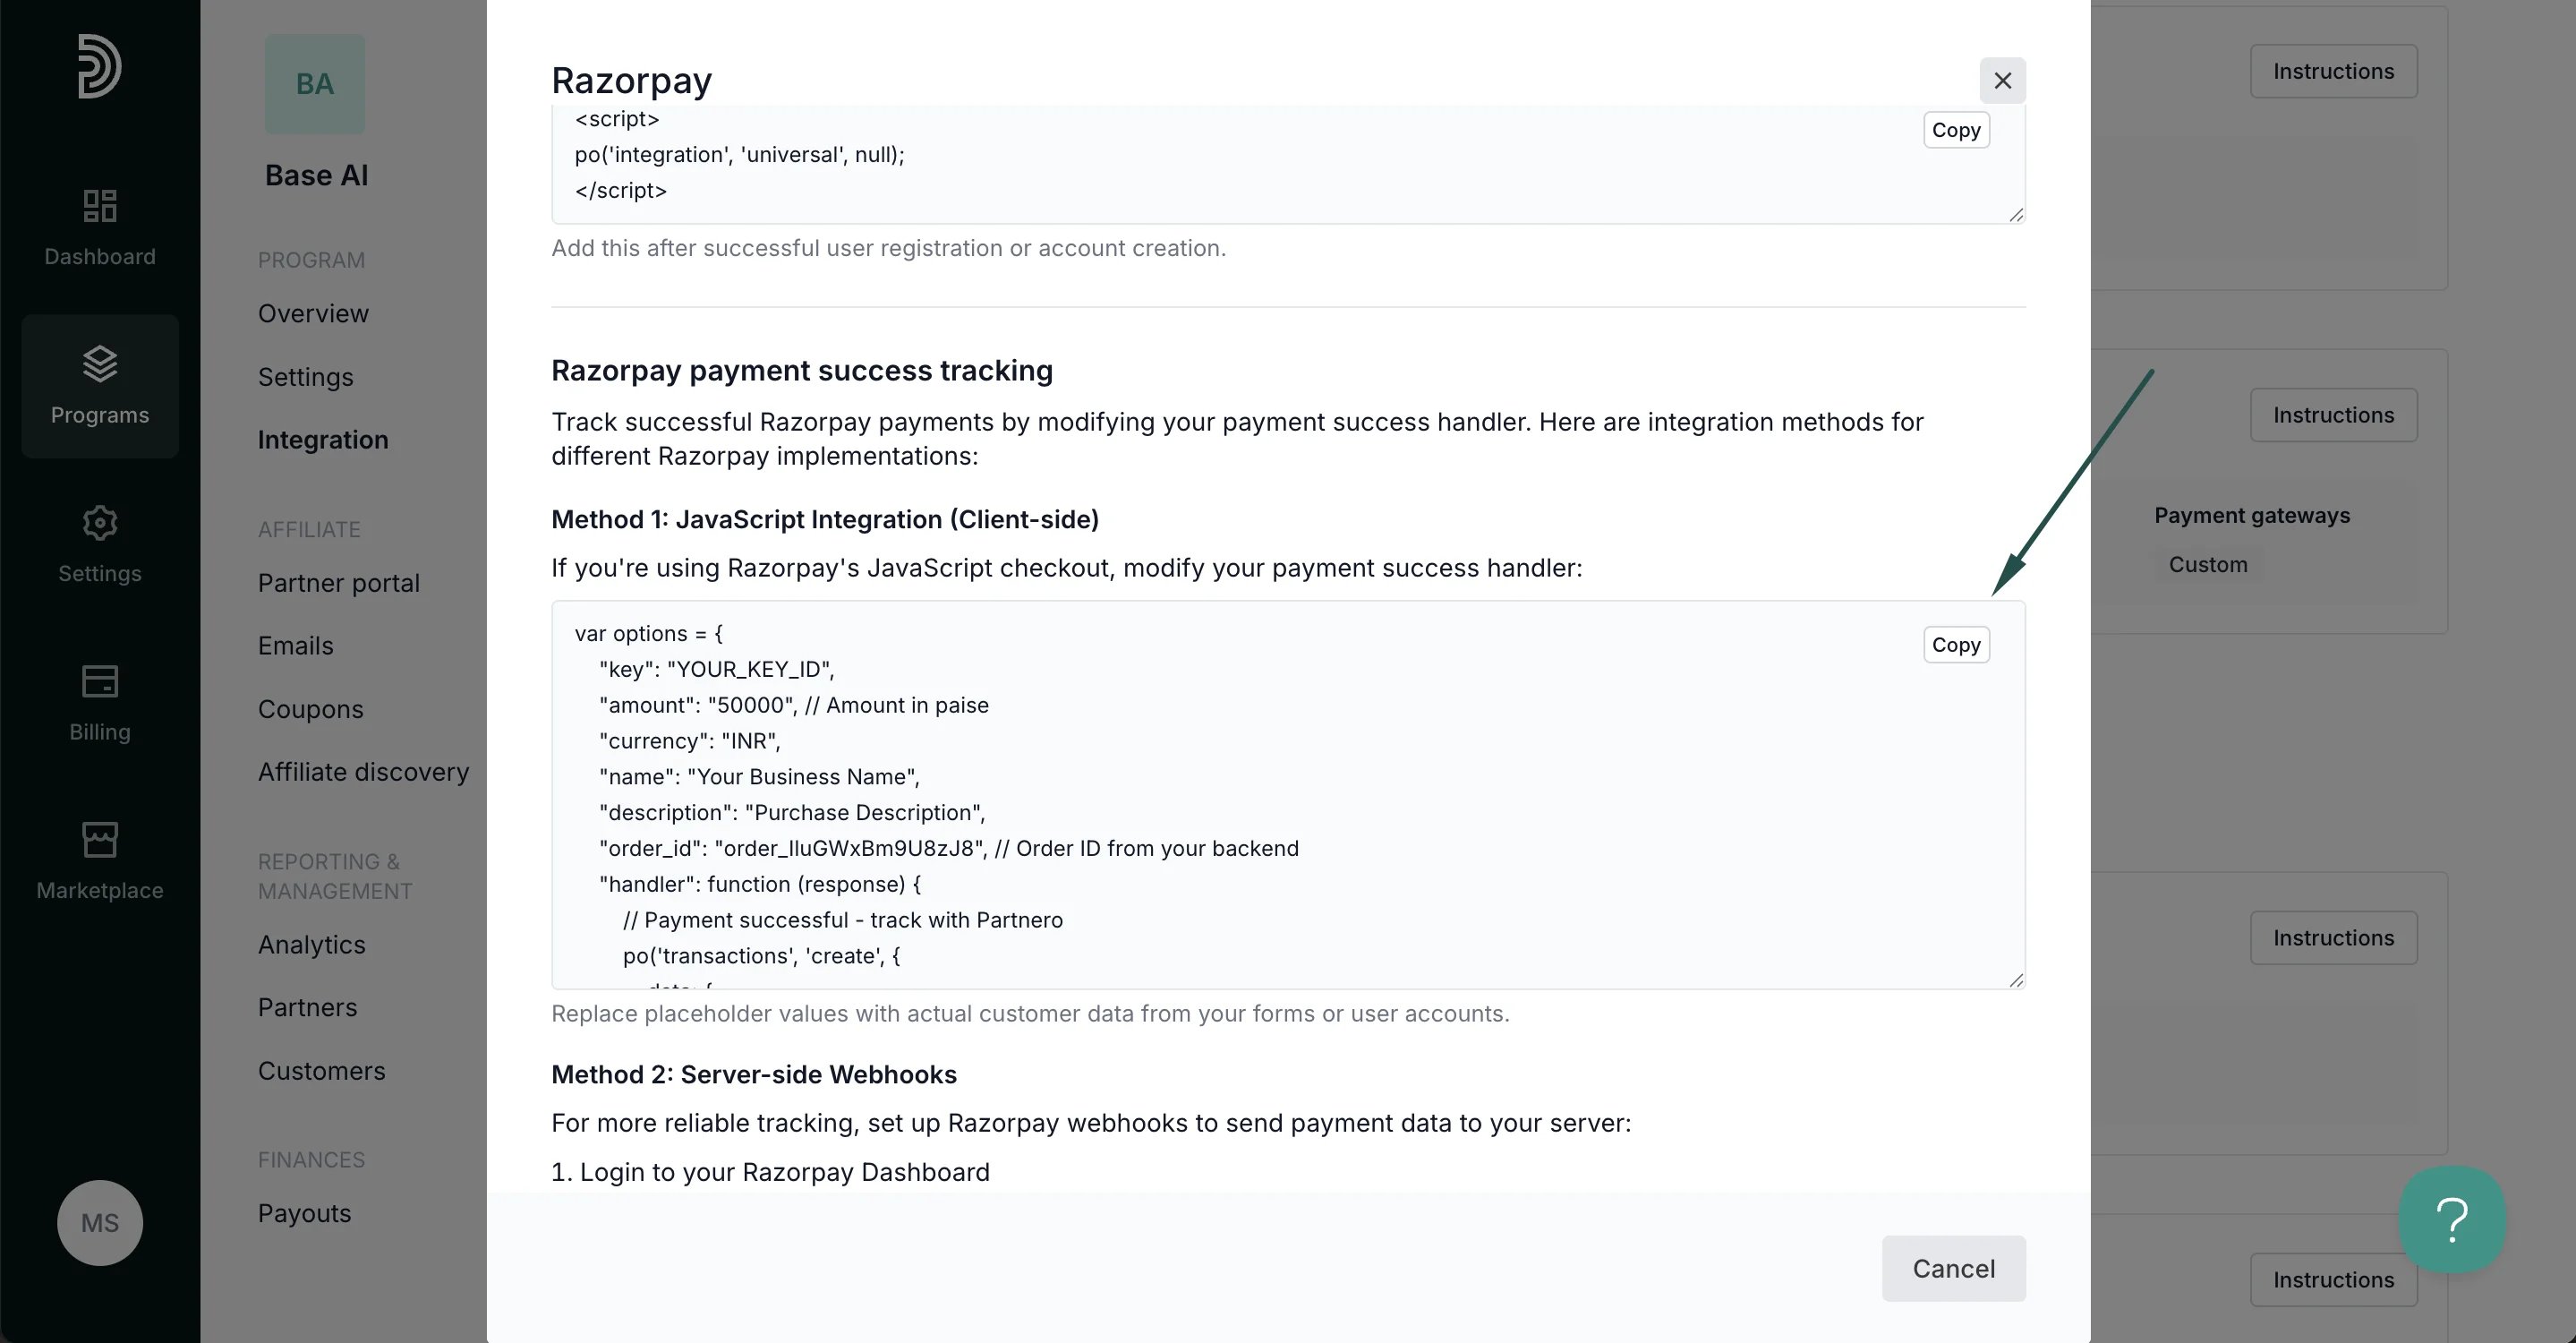 Make sure to replace placeholder values with actual customer data from your forms or user accounts.
#### Method 2: Server-side Webhooks
Alternatively, you can set up Razorpay webhooks to send payment data to your server:
1. Log in to your Razorpay Dashboard
2. Go to **Settings** → **Webhooks**
3. Add a new webhook with URL: `https://yoursite.com/webhook/razorpay`
4. Subscribe to *payment.captured* events.
Use the sample PHP webhook handler to adapt it to your backend technology:
Make sure to replace placeholder values with actual customer data from your forms or user accounts.
#### Method 2: Server-side Webhooks
Alternatively, you can set up Razorpay webhooks to send payment data to your server:
1. Log in to your Razorpay Dashboard
2. Go to **Settings** → **Webhooks**
3. Add a new webhook with URL: `https://yoursite.com/webhook/razorpay`
4. Subscribe to *payment.captured* events.
Use the sample PHP webhook handler to adapt it to your backend technology: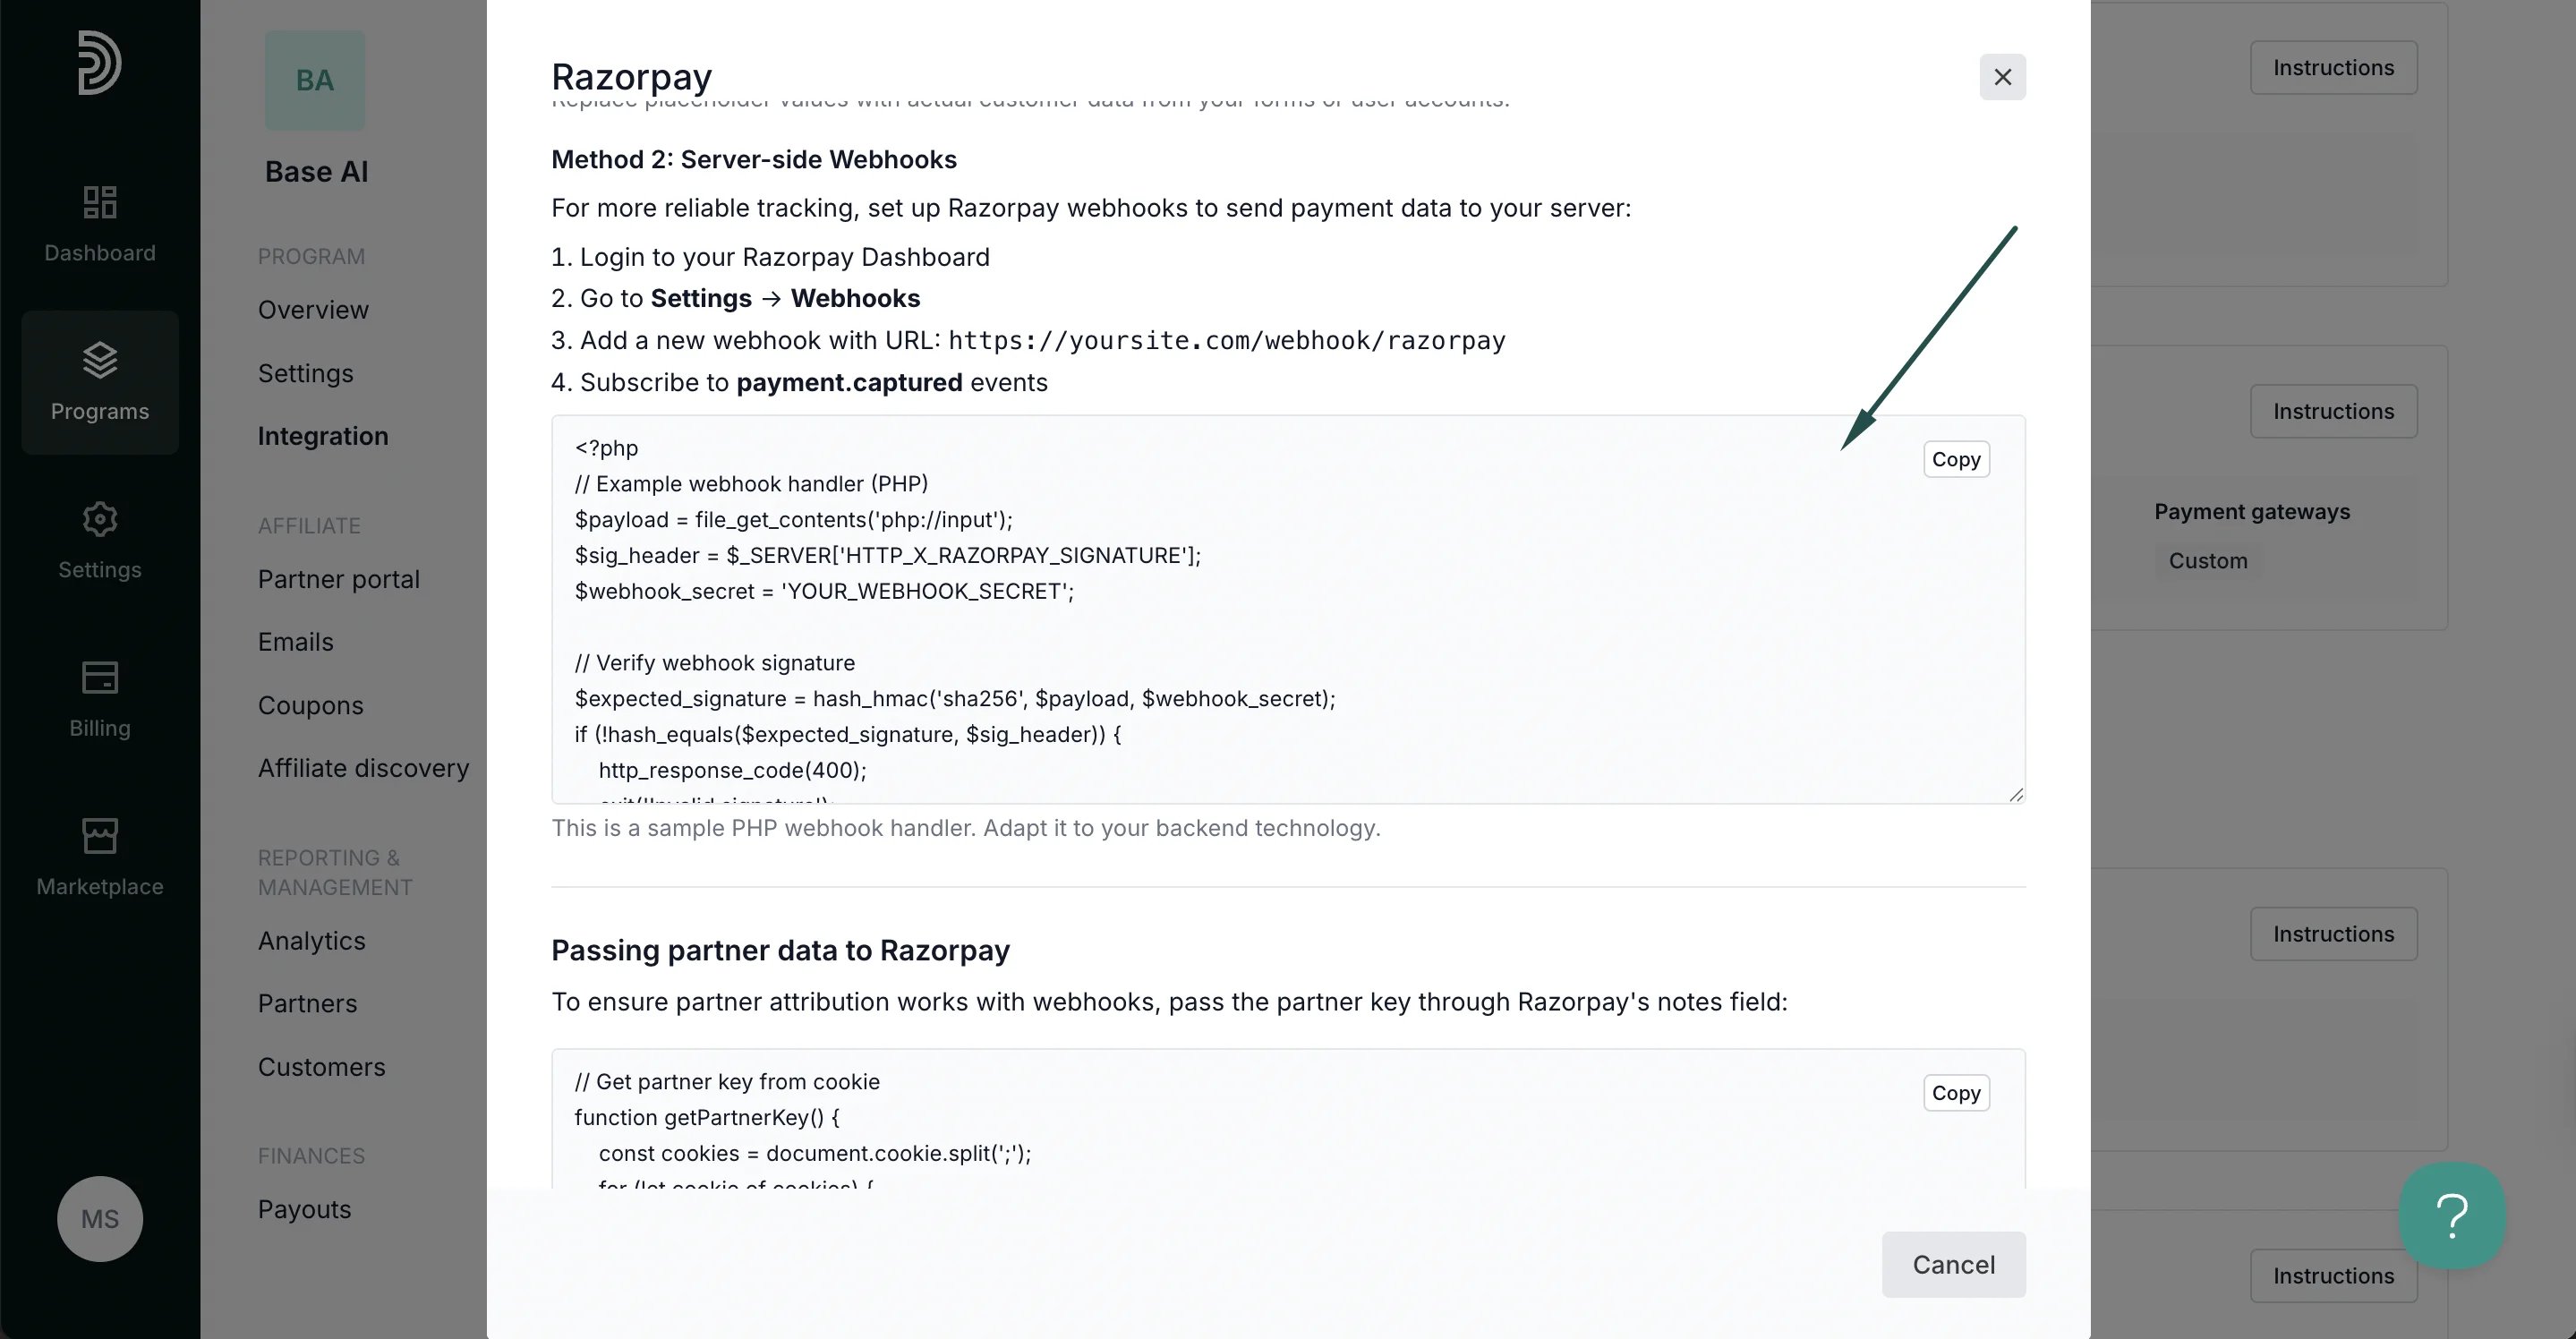 ***
### Step 3: Pass partner data to Razorpay
To ensure partner attribution works with webhooks, pass the partner key through Razorpay's notes field:
***
### Step 3: Pass partner data to Razorpay
To ensure partner attribution works with webhooks, pass the partner key through Razorpay's notes field: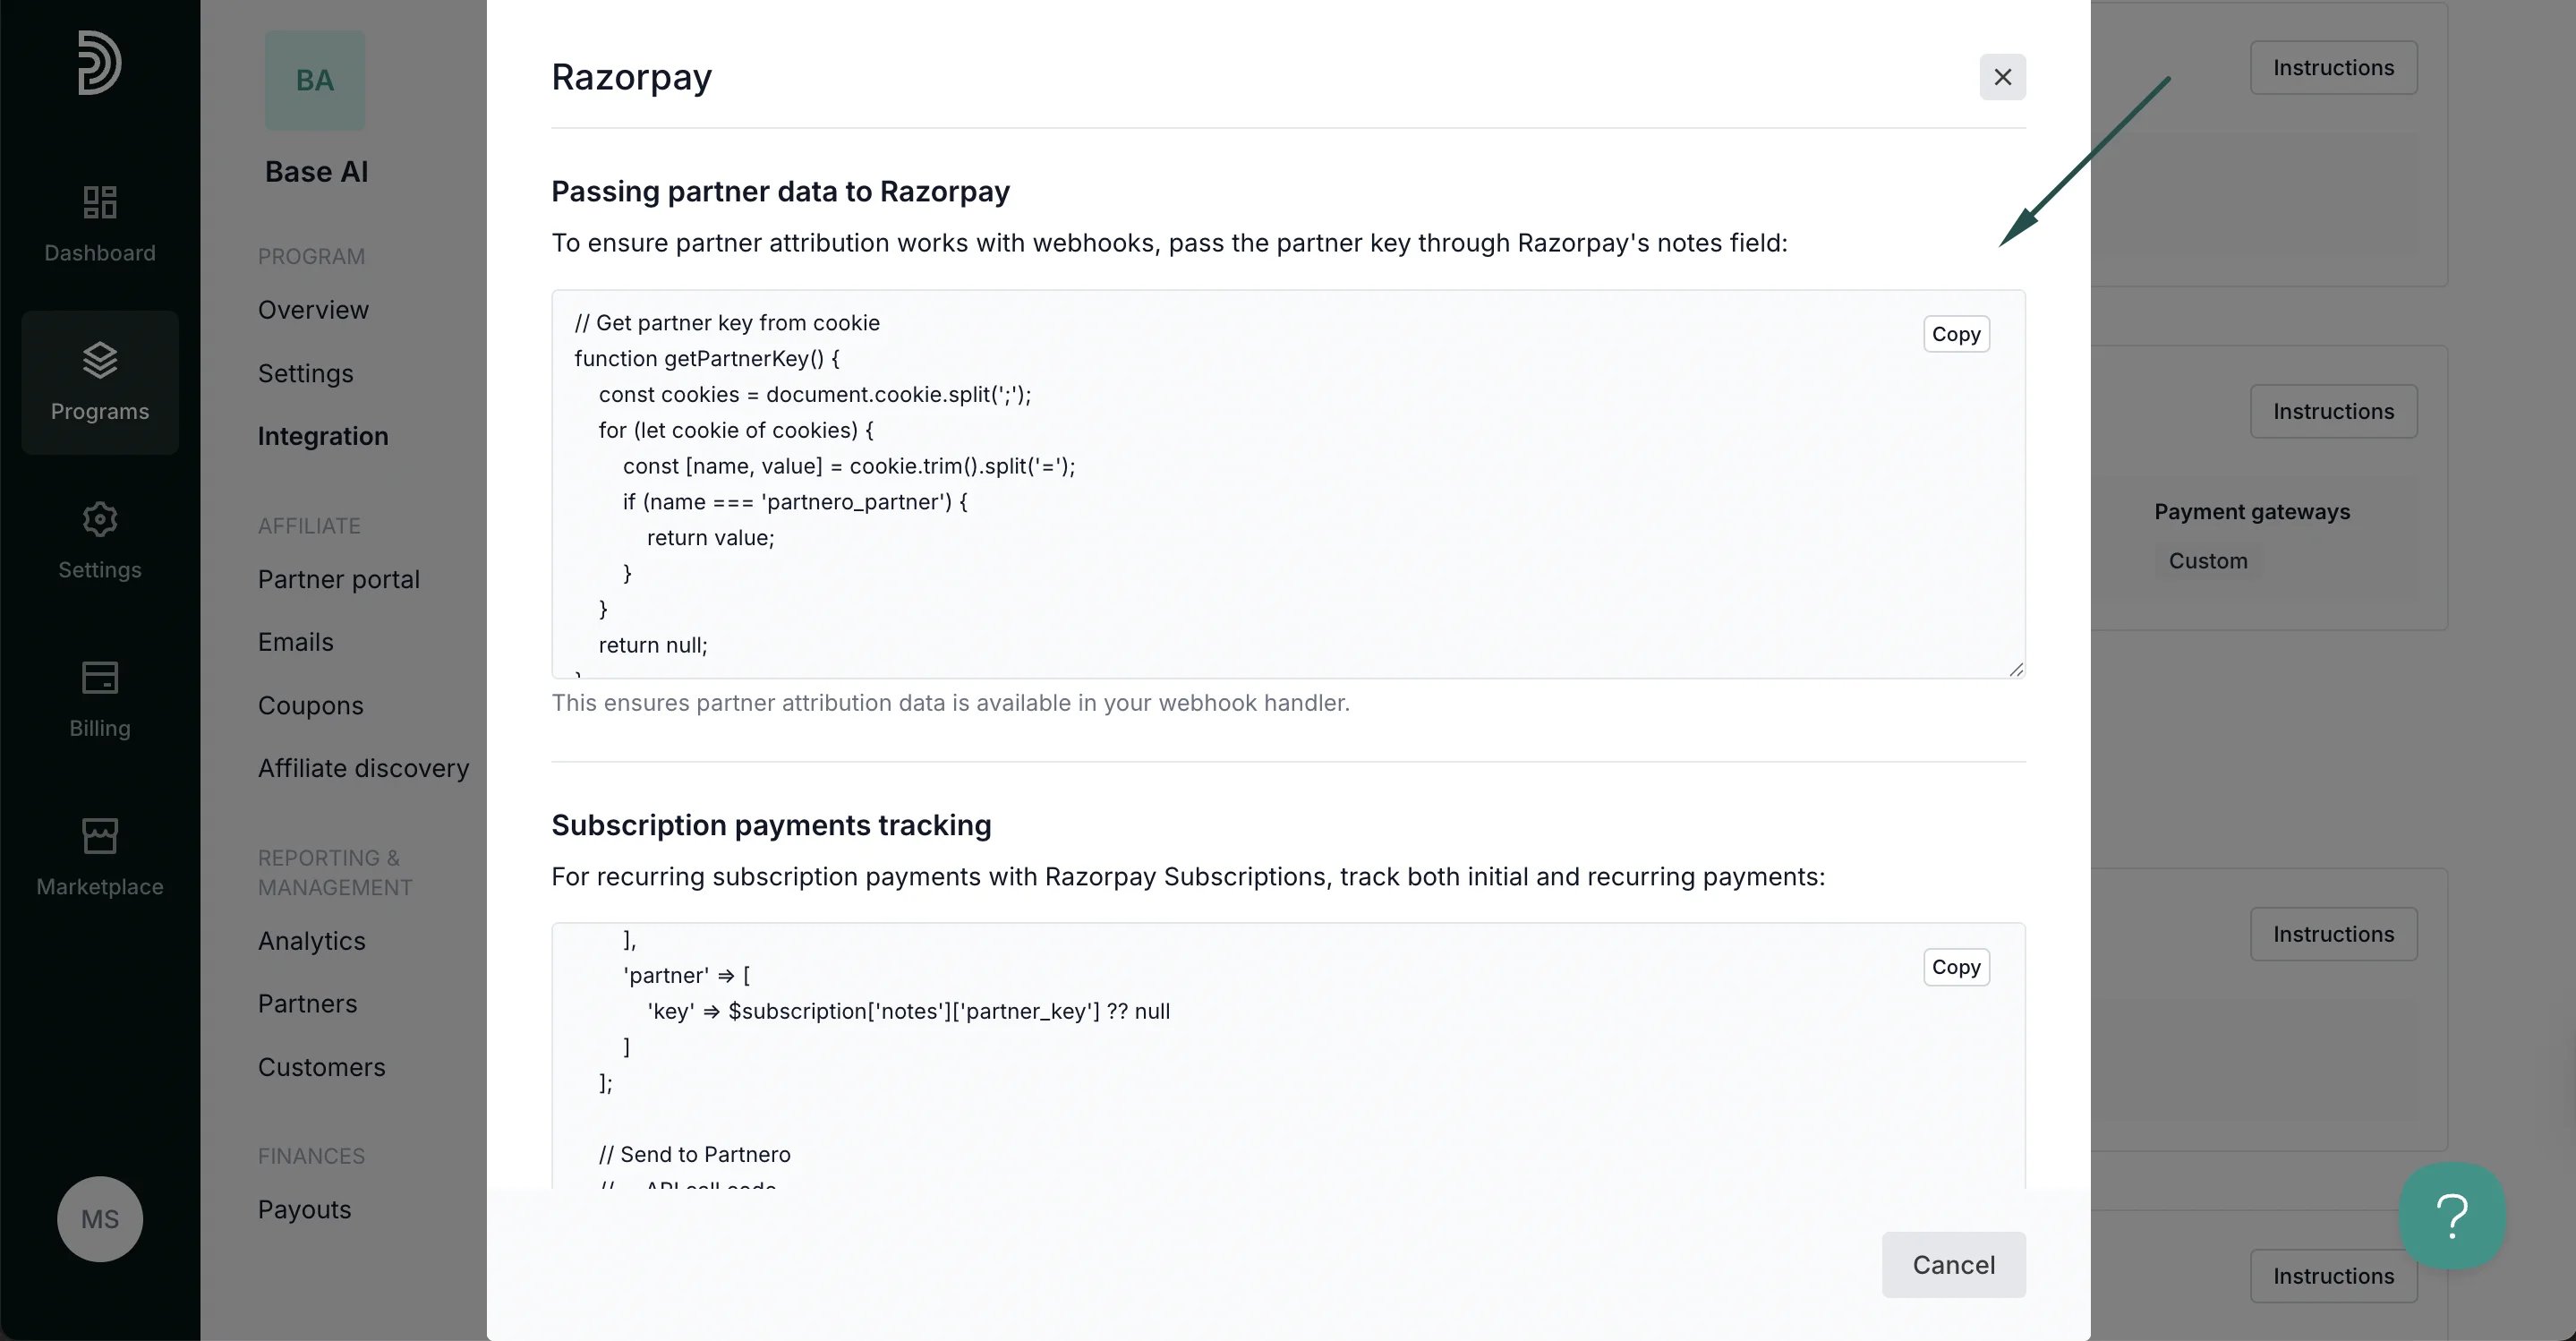 ***
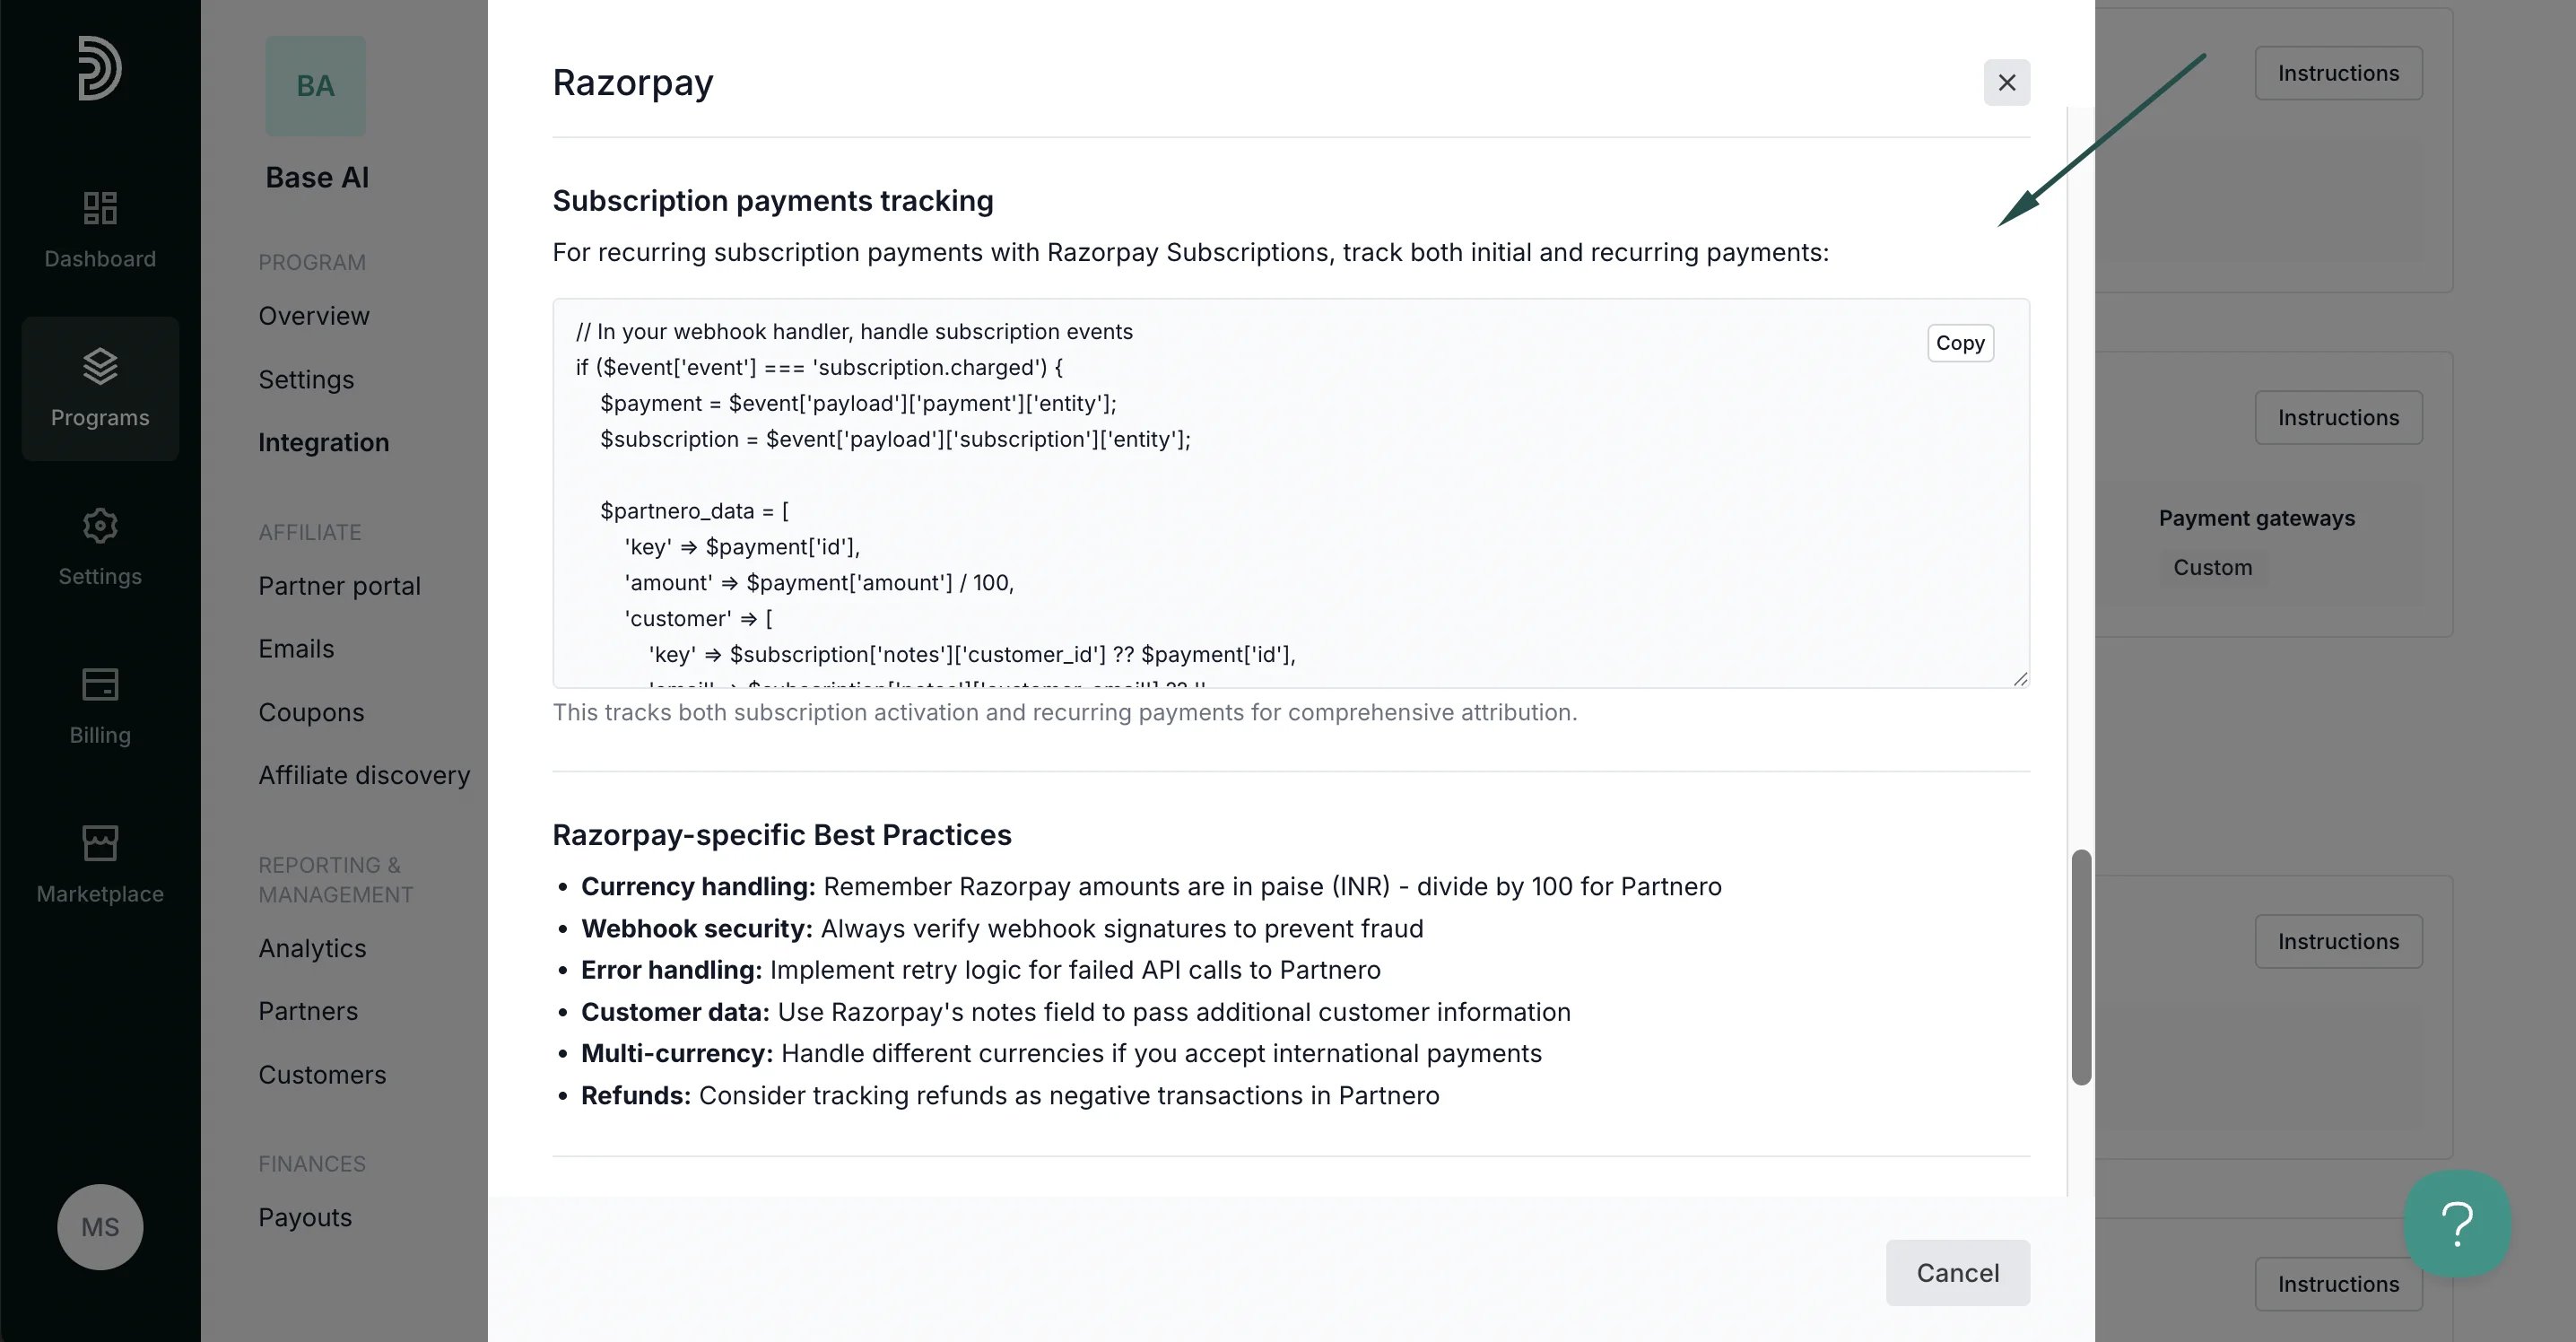
### Step 4: Track subscription payments
For recurring subscription payments with Razorpay Subscriptions, track both initial and recurring payments:
***
### Step 4: Track subscription payments
For recurring subscription payments with Razorpay Subscriptions, track both initial and recurring payments:
 ***
### Razorpay-specific best practices
* **Currency handling**: Remember Razorpay amounts are in paise (INR) - divide by 100 for Partnero
* **Webhook security**: Always verify webhook signatures to prevent fraud
* **Error handling**: Implement retry logic for failed API calls to Partnero
* **Customer data**: Use Razorpay's notes field to pass additional customer information
* **Multi-currency**: Handle different currencies if you accept international payments
* **Refunds**: Consider tracking refunds as negative transactions in Partnero
***
### Common integration issues
* **Missing partner attribution**: Ensure the partner key is passed through Razorpay notes
* **Amount mismatch**: Convert paise to rupees when sending to Partnero
* **Webhook failures**: Check your server logs and Razorpay webhook logs
* **Cookie expiration**: Consider extending cookie lifetime for longer purchase journeys
***
This documentation is built and hosted on [Mintlify](https://mintlify.com), a developer documentation platform.
***
### Razorpay-specific best practices
* **Currency handling**: Remember Razorpay amounts are in paise (INR) - divide by 100 for Partnero
* **Webhook security**: Always verify webhook signatures to prevent fraud
* **Error handling**: Implement retry logic for failed API calls to Partnero
* **Customer data**: Use Razorpay's notes field to pass additional customer information
* **Multi-currency**: Handle different currencies if you accept international payments
* **Refunds**: Consider tracking refunds as negative transactions in Partnero
***
### Common integration issues
* **Missing partner attribution**: Ensure the partner key is passed through Razorpay notes
* **Amount mismatch**: Convert paise to rupees when sending to Partnero
* **Webhook failures**: Check your server logs and Razorpay webhook logs
* **Cookie expiration**: Consider extending cookie lifetime for longer purchase journeys
***
This documentation is built and hosted on [Mintlify](https://mintlify.com), a developer documentation platform.