> ## Documentation Index
> Fetch the complete documentation index at: https://docs.partnero.com/llms.txt
> Use this file to discover all available pages before exploring further.
# Partner portal: Settings
To access Partner Portal settings:
1. Open your affiliate program.
2. On the left sidebar, click on **Partner Portal** under **Affiliate**.
3. You will land on the **Settings** tab: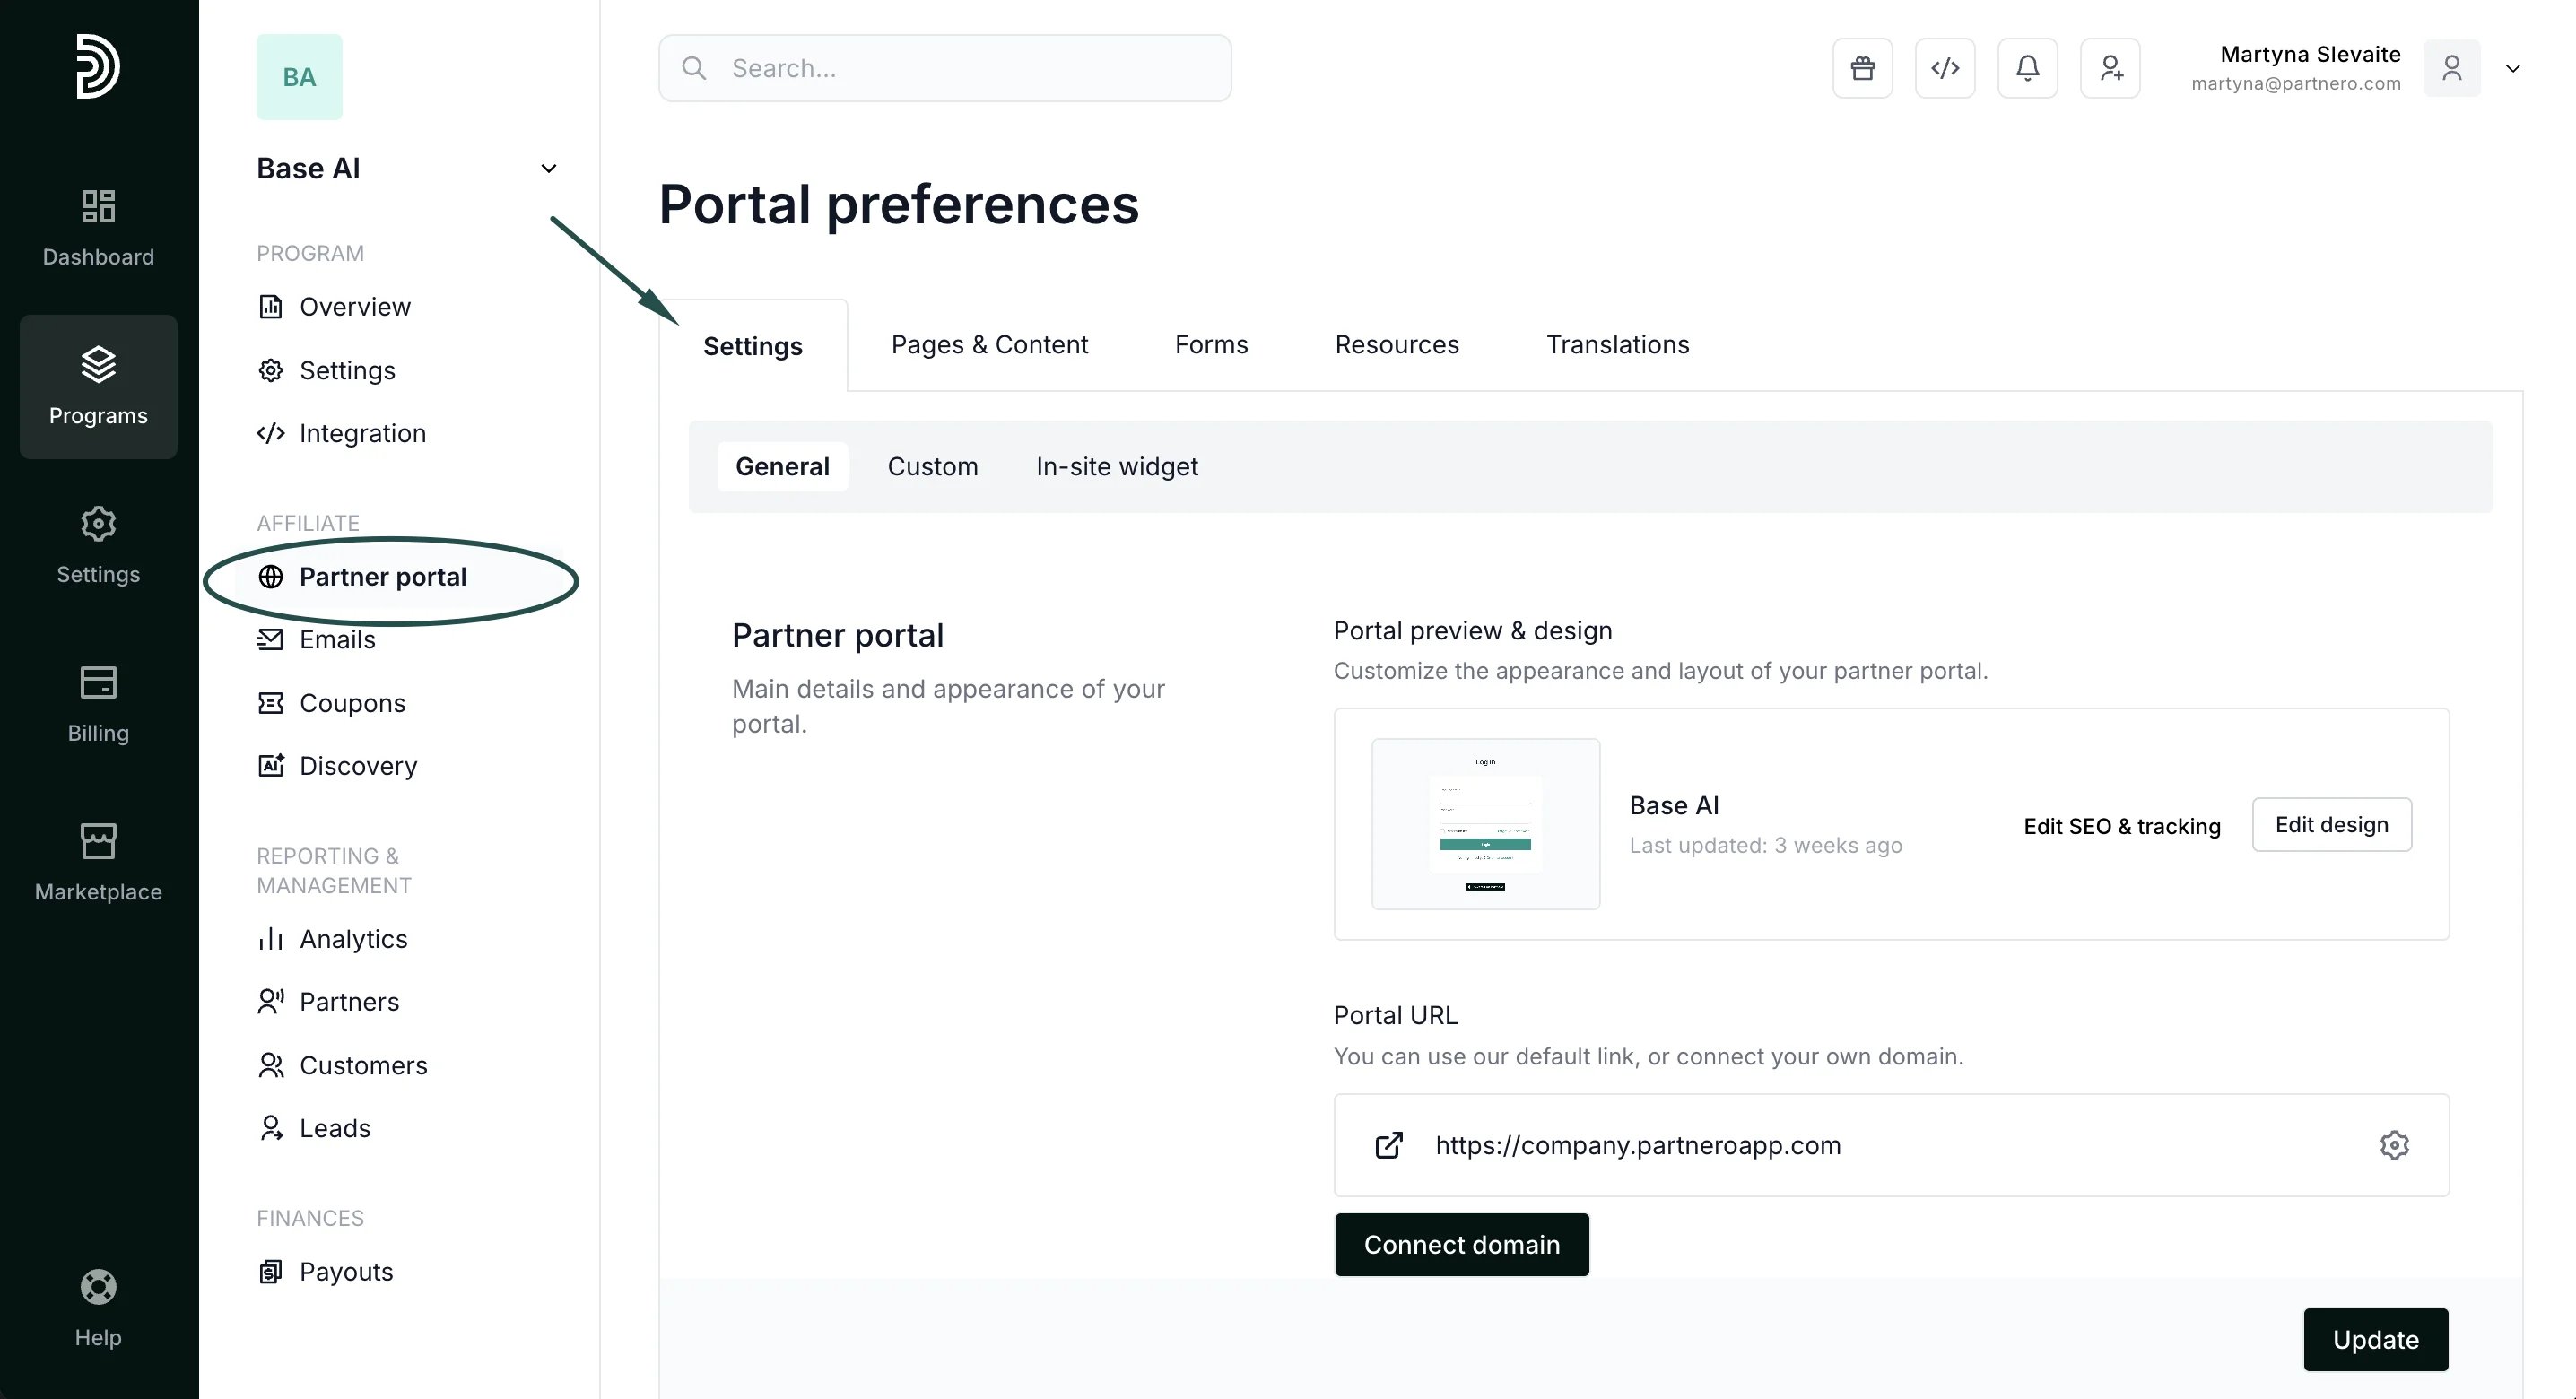 There are three sections here: General, Custom, and In-site widget. Below, we will review each tab.
***
### 1. General
There are three sections here: General, Custom, and In-site widget. Below, we will review each tab.
***
### 1. General
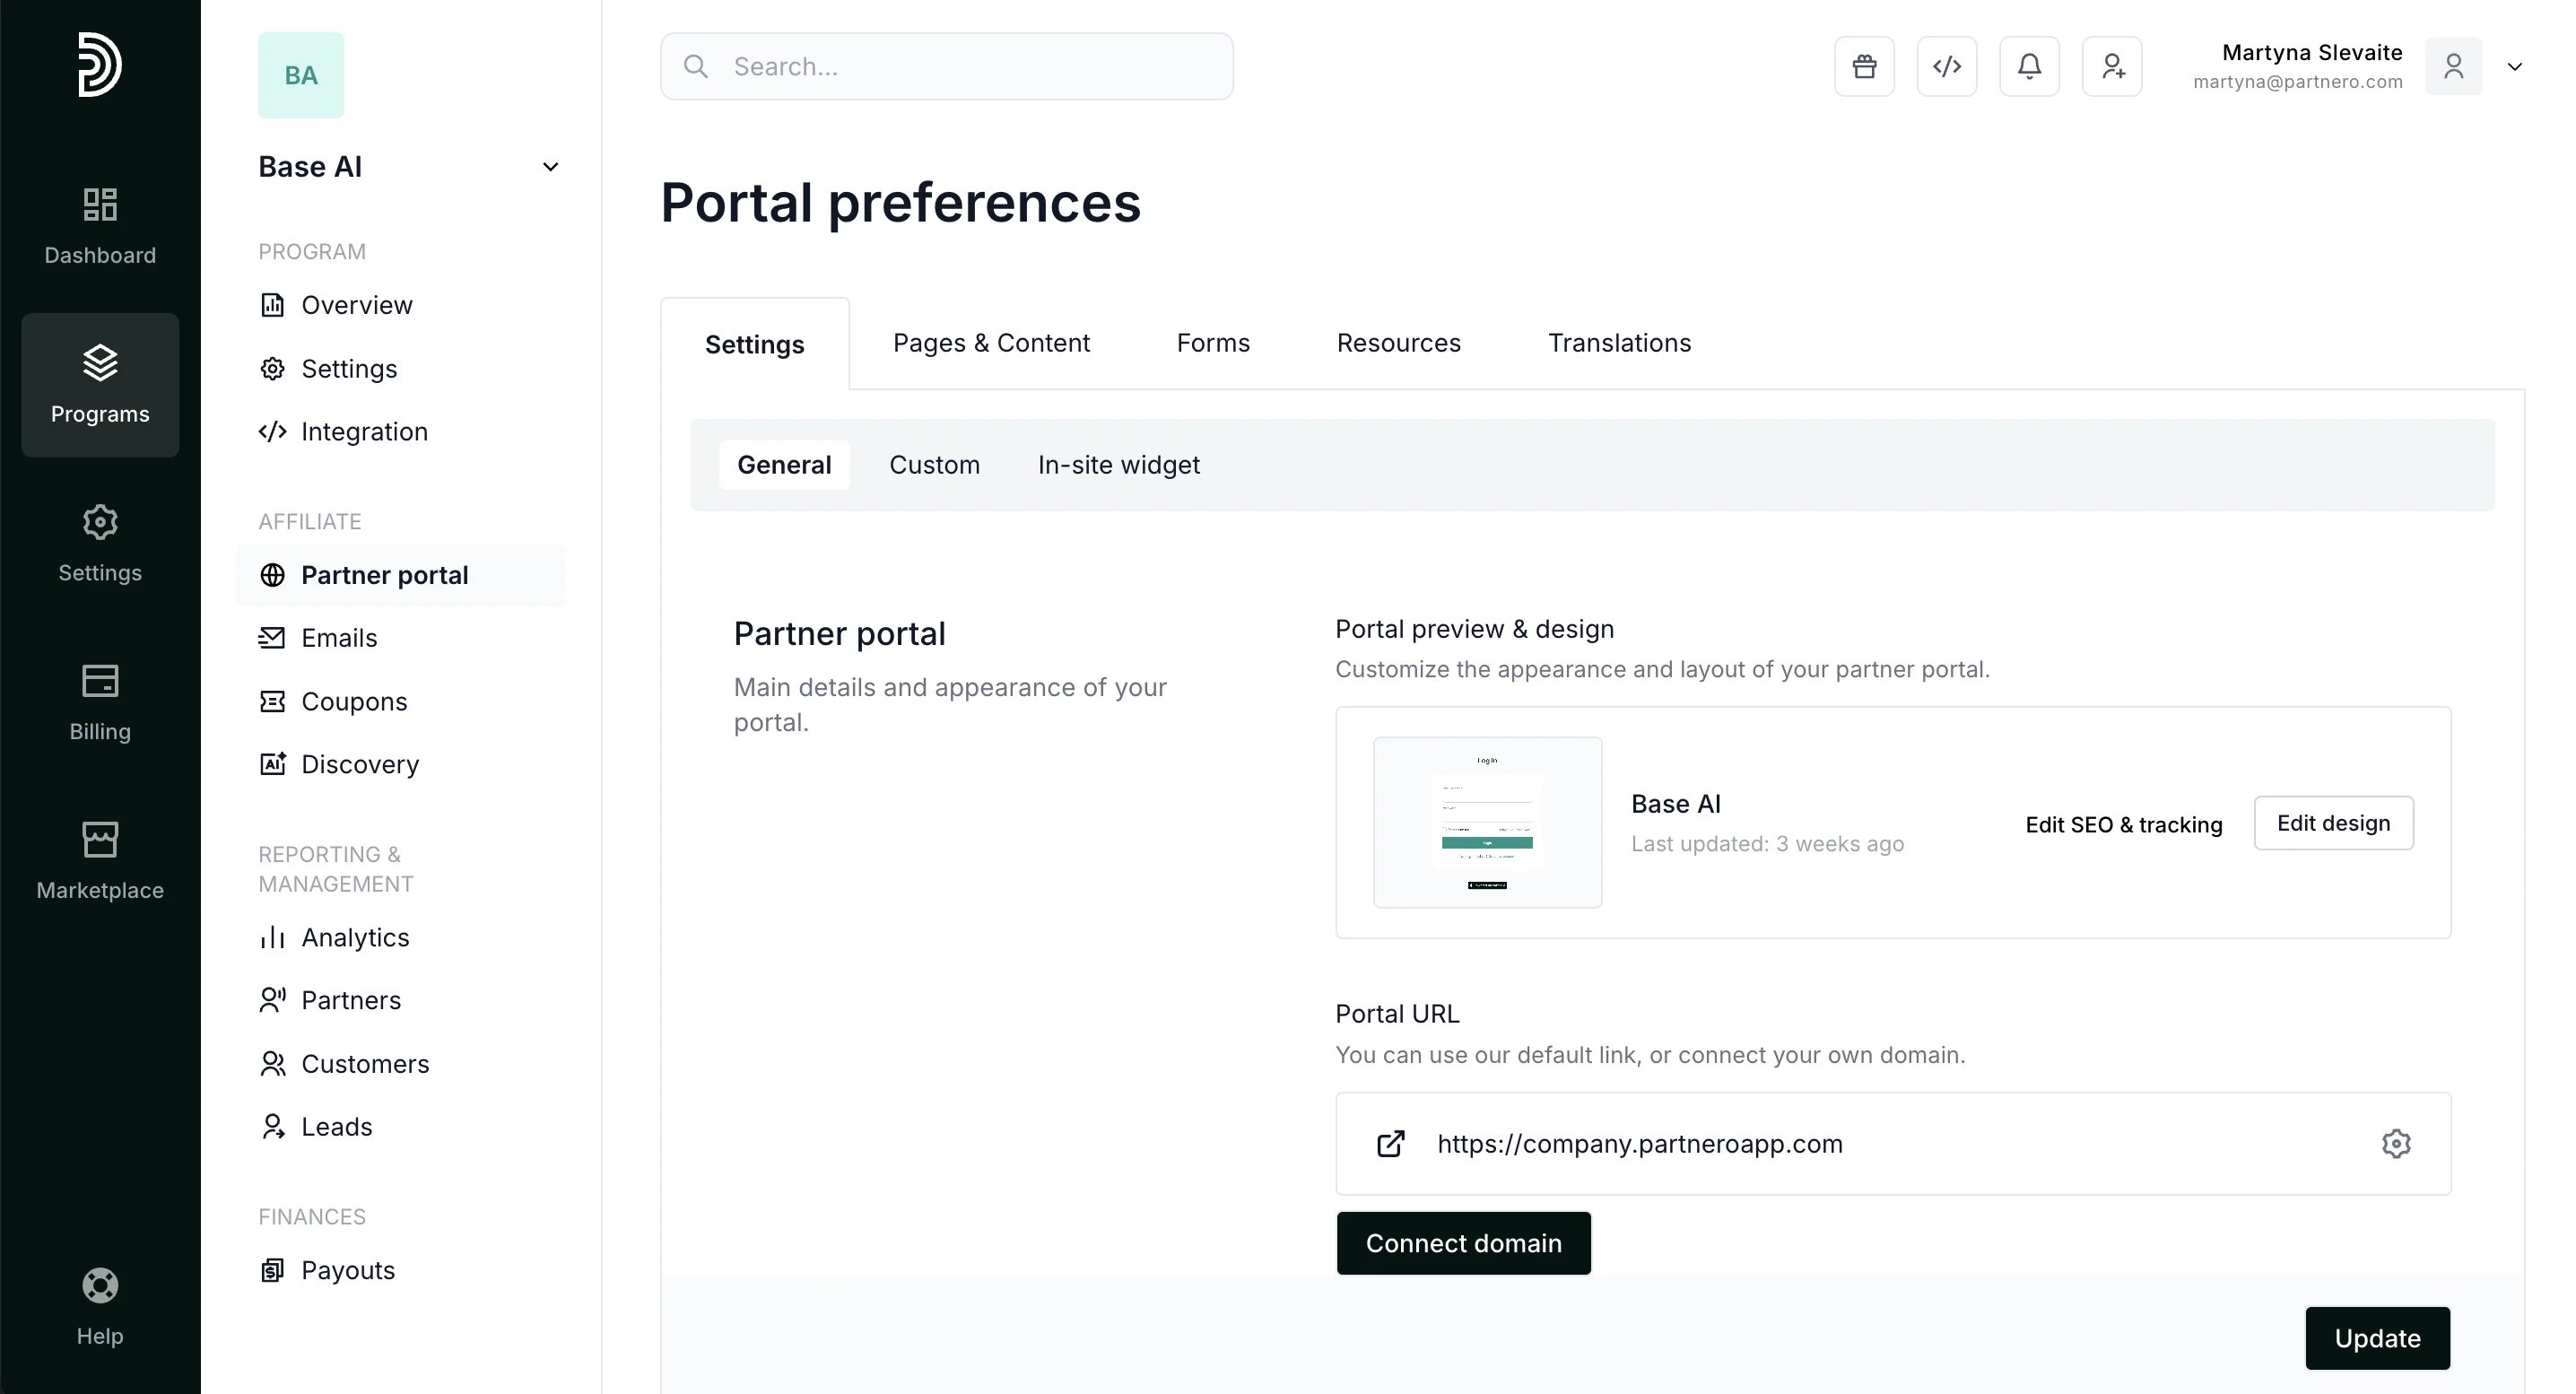 The first section allows you to:
* Customize the portal appearance and layout [using Live Designer](/knowledge-base/program-management/live-designer-overview).
* [Edit portal SEO and tracking](/knowledge-base/partner-portal/customize-partner-portal-seo-and-tracking).
* [Connect a custom partner portal domain](/knowledge-base/partner-portal/connect-a-partner-portal-domain).
* Select a default page to be shown, then access the partner portal. You can choose between a standard [log-in page](/knowledge-base/partner-portal/customize-signup-and-login-pages) and the [program introduction](/knowledge-base/partner-portal/create-a-program-page) page.
Below you'll find **Branding** settings:
The first section allows you to:
* Customize the portal appearance and layout [using Live Designer](/knowledge-base/program-management/live-designer-overview).
* [Edit portal SEO and tracking](/knowledge-base/partner-portal/customize-partner-portal-seo-and-tracking).
* [Connect a custom partner portal domain](/knowledge-base/partner-portal/connect-a-partner-portal-domain).
* Select a default page to be shown, then access the partner portal. You can choose between a standard [log-in page](/knowledge-base/partner-portal/customize-signup-and-login-pages) and the [program introduction](/knowledge-base/partner-portal/create-a-program-page) page.
Below you'll find **Branding** settings: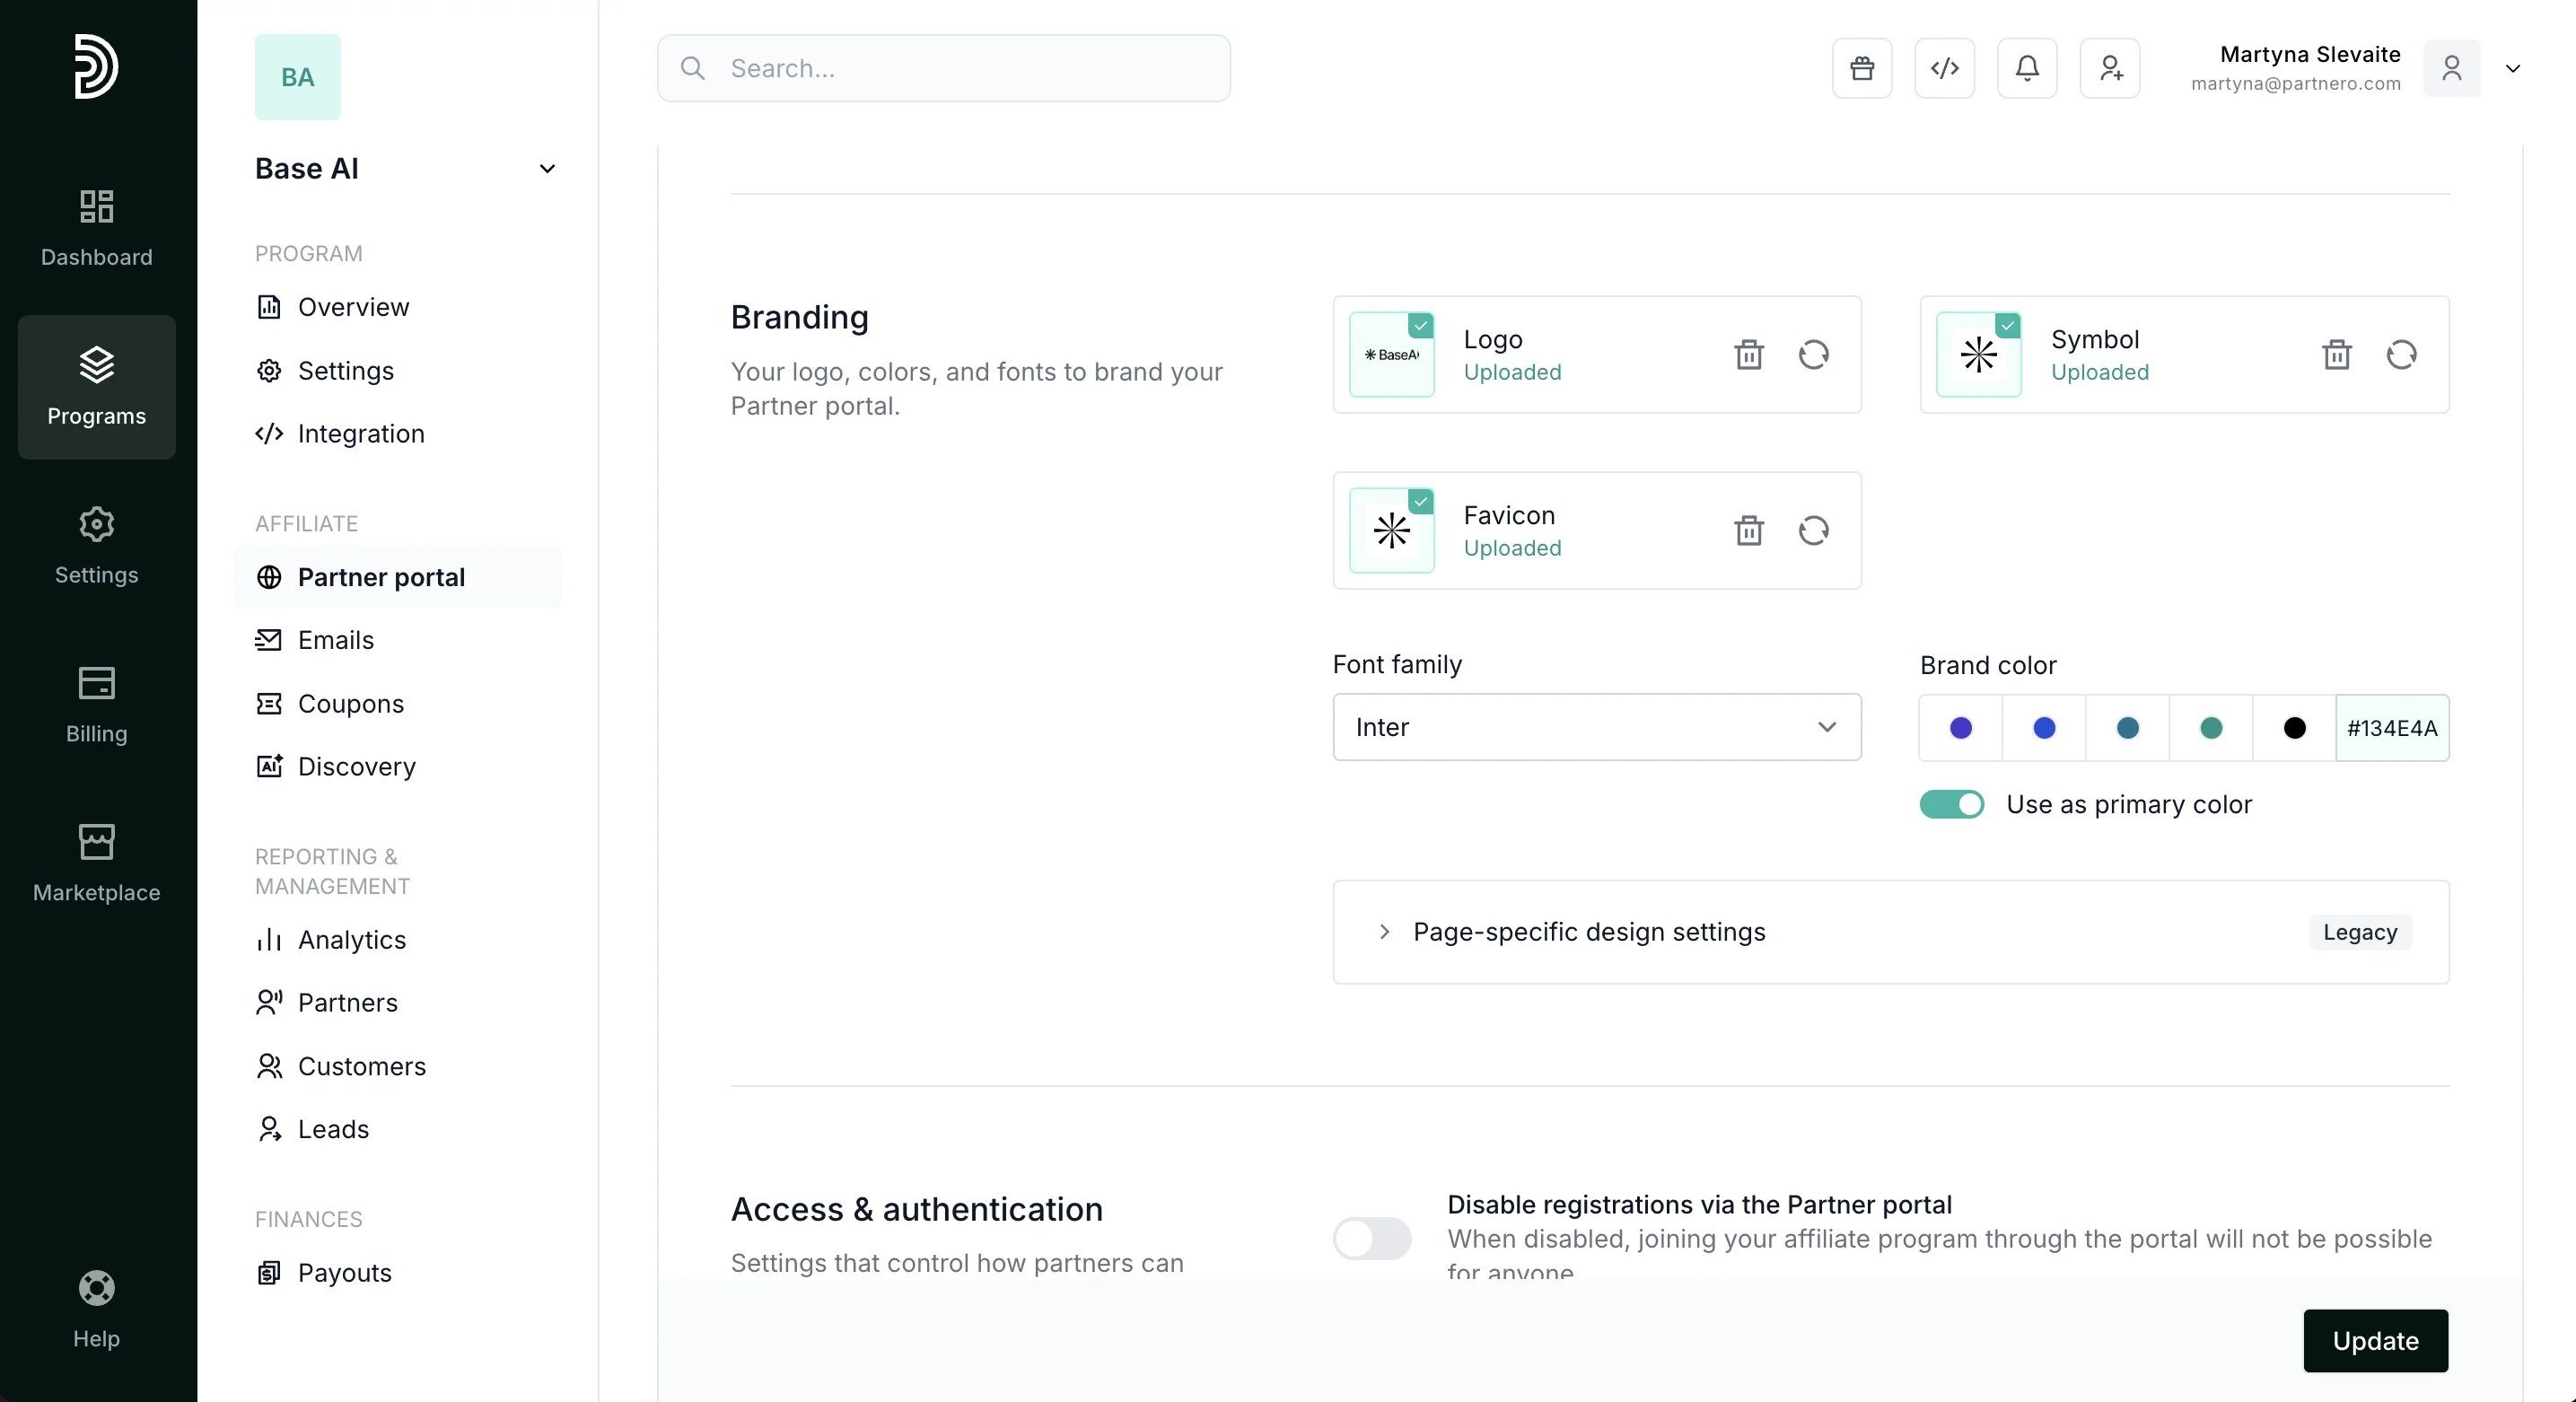 Here you can upload your logo, symbol, and favicon. Additionally, you can select your font family and primary brand color.
Next, you'll find **Access & Authentication** settings:
Here you can upload your logo, symbol, and favicon. Additionally, you can select your font family and primary brand color.
Next, you'll find **Access & Authentication** settings: 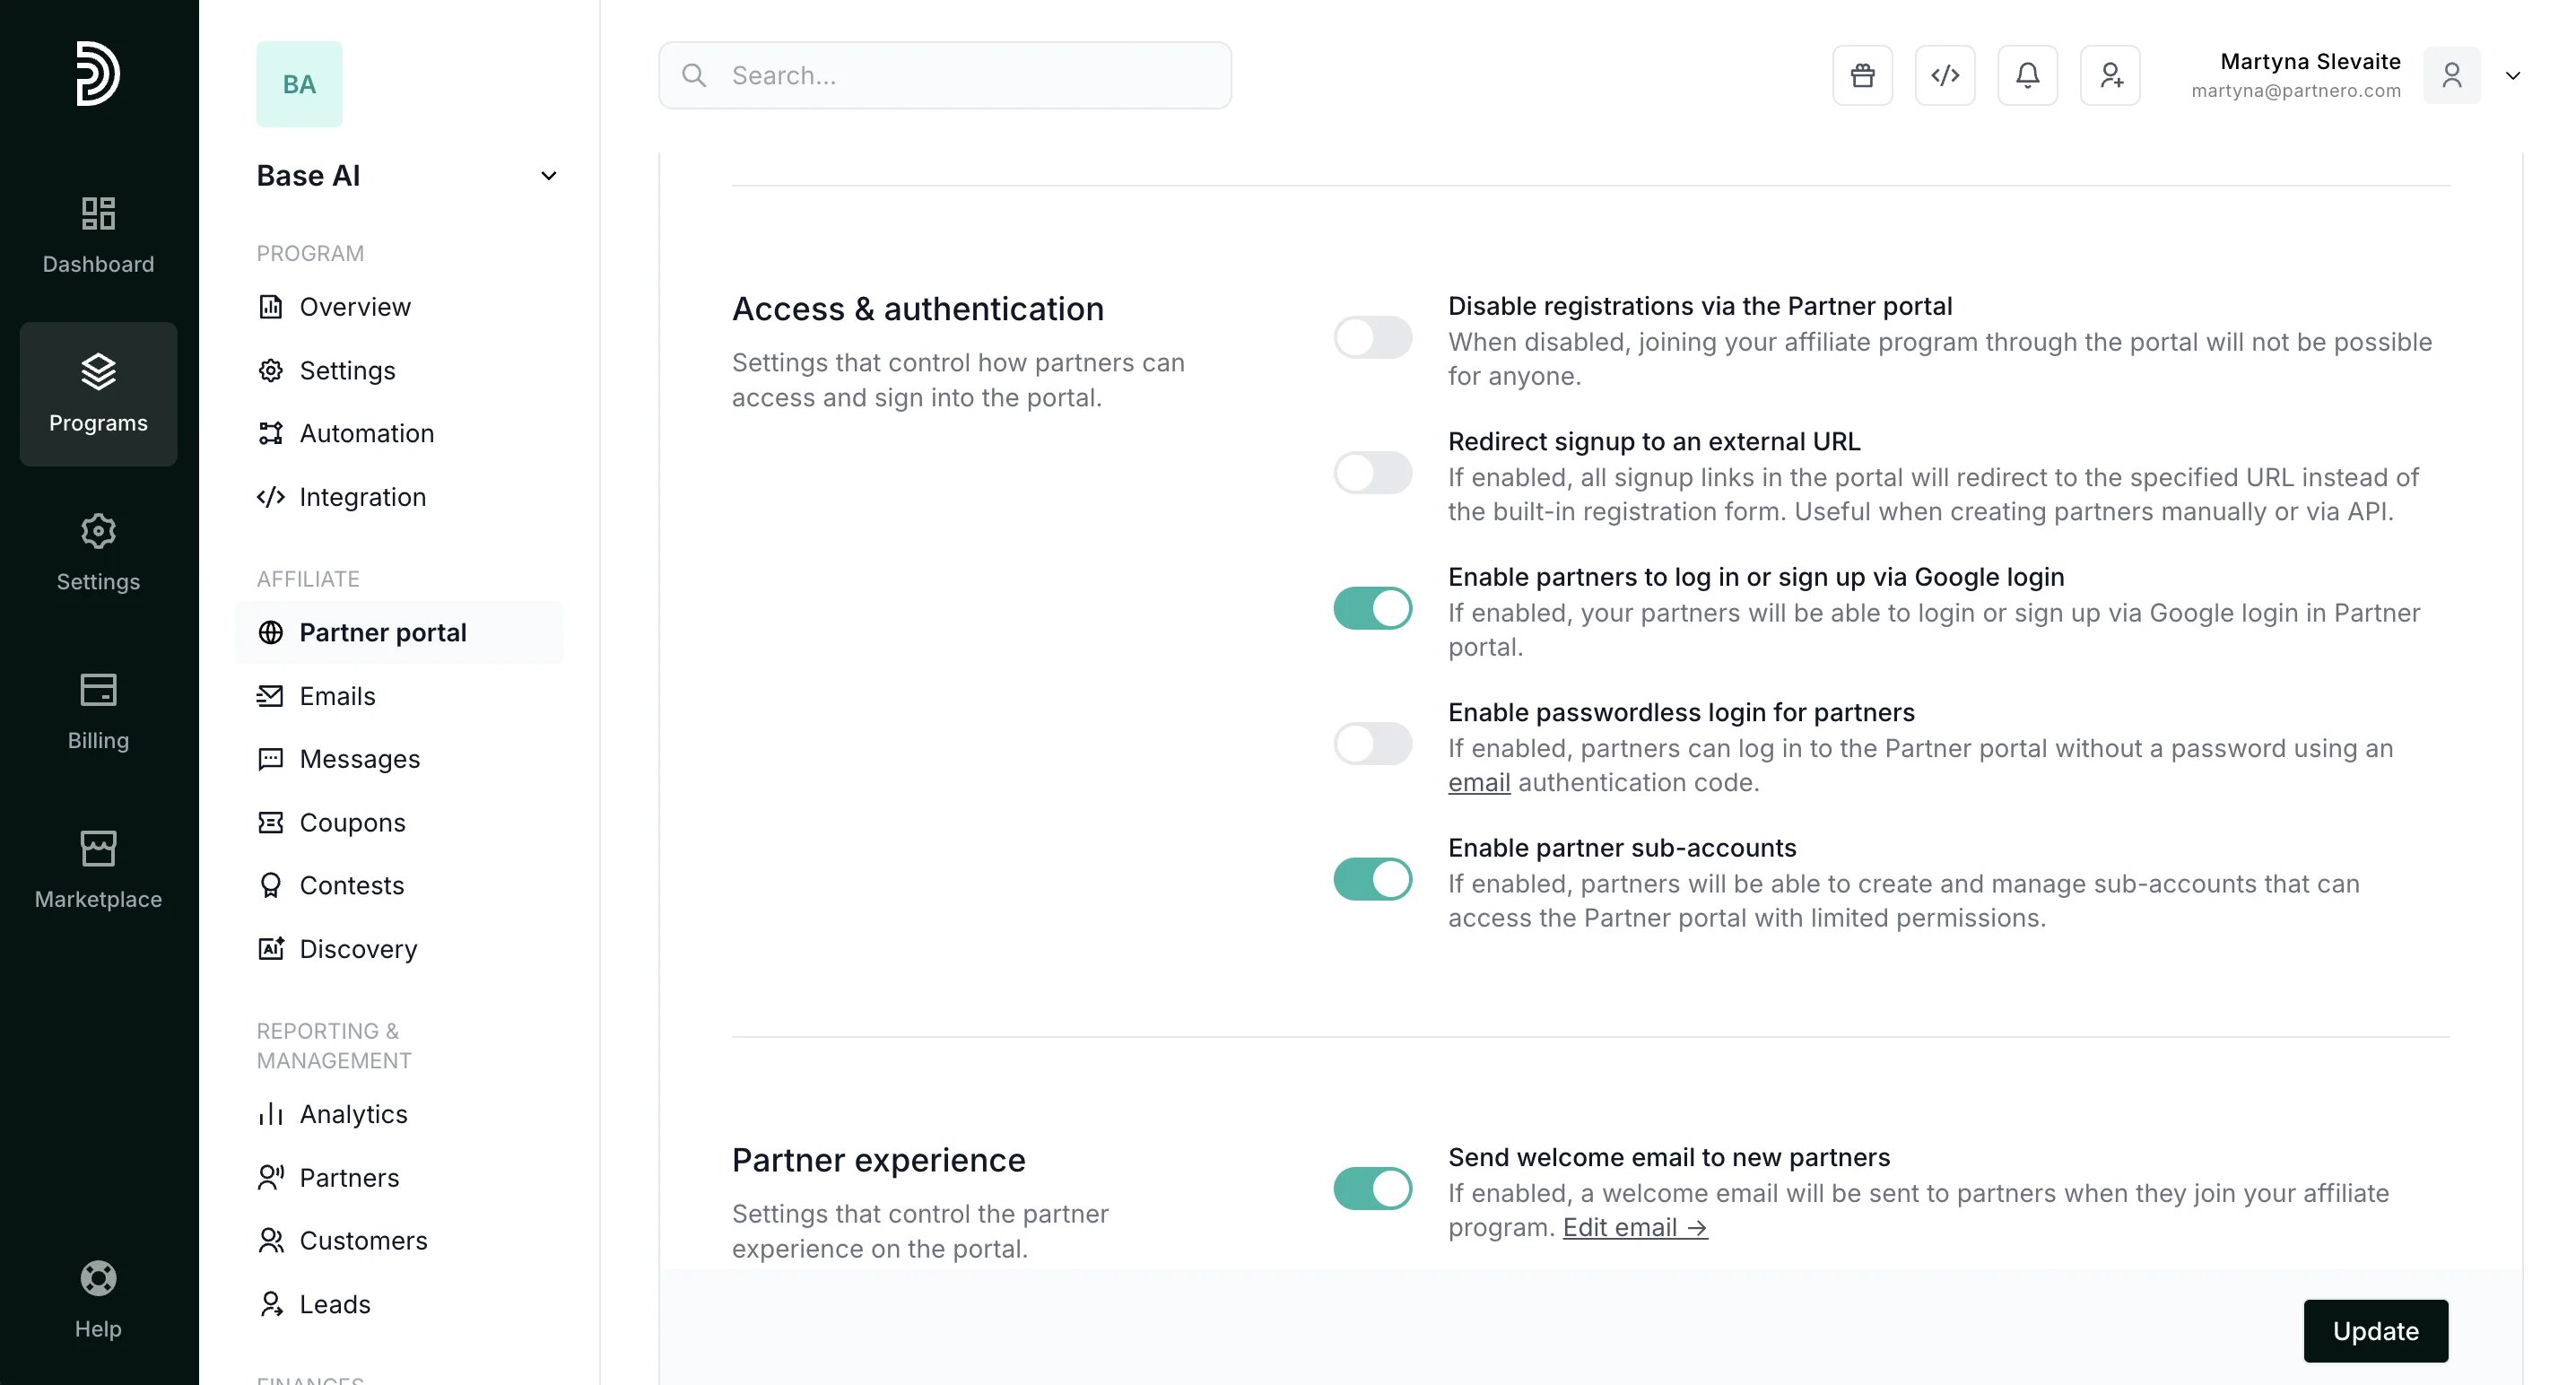 The following options are available:
* **Disable registrations via the Partner portal**: hides the signup page to pause new partner registrations.
* **Redirect signup to an external URL**: If enabled, all signup links in the portal will redirect to the specified URL instead of the built-in registration form. Useful when creating partners manually or via API. [Read more](/knowledge-base/partner-portal/redirect-partner-signup-to-an-external-url).
* **Enable partners to log in or sign in via Google login**: add the Google login option to the partner portal. [Read more](/knowledge-base/partner-portal/enable-google-social-login-for-affiliate-portal).
* **Enable passwordless login for partners**: if enabled, partners will not be required to create a password. A one-time authentication code will be sent to your partners every time they log in. [Read more](/knowledge-base/partner-portal/one-time-password-otp-for-partner-portal).
* Enable partner sub-accounts: if enabled, partners can create and manage sub-accounts in the partner portal. [Read more](/knowledge-base/partner-management/partner-sub-accounts-overview).
Next, you will find the **Portal features:
The following options are available:
* **Disable registrations via the Partner portal**: hides the signup page to pause new partner registrations.
* **Redirect signup to an external URL**: If enabled, all signup links in the portal will redirect to the specified URL instead of the built-in registration form. Useful when creating partners manually or via API. [Read more](/knowledge-base/partner-portal/redirect-partner-signup-to-an-external-url).
* **Enable partners to log in or sign in via Google login**: add the Google login option to the partner portal. [Read more](/knowledge-base/partner-portal/enable-google-social-login-for-affiliate-portal).
* **Enable passwordless login for partners**: if enabled, partners will not be required to create a password. A one-time authentication code will be sent to your partners every time they log in. [Read more](/knowledge-base/partner-portal/one-time-password-otp-for-partner-portal).
* Enable partner sub-accounts: if enabled, partners can create and manage sub-accounts in the partner portal. [Read more](/knowledge-base/partner-management/partner-sub-accounts-overview).
Next, you will find the **Portal features: 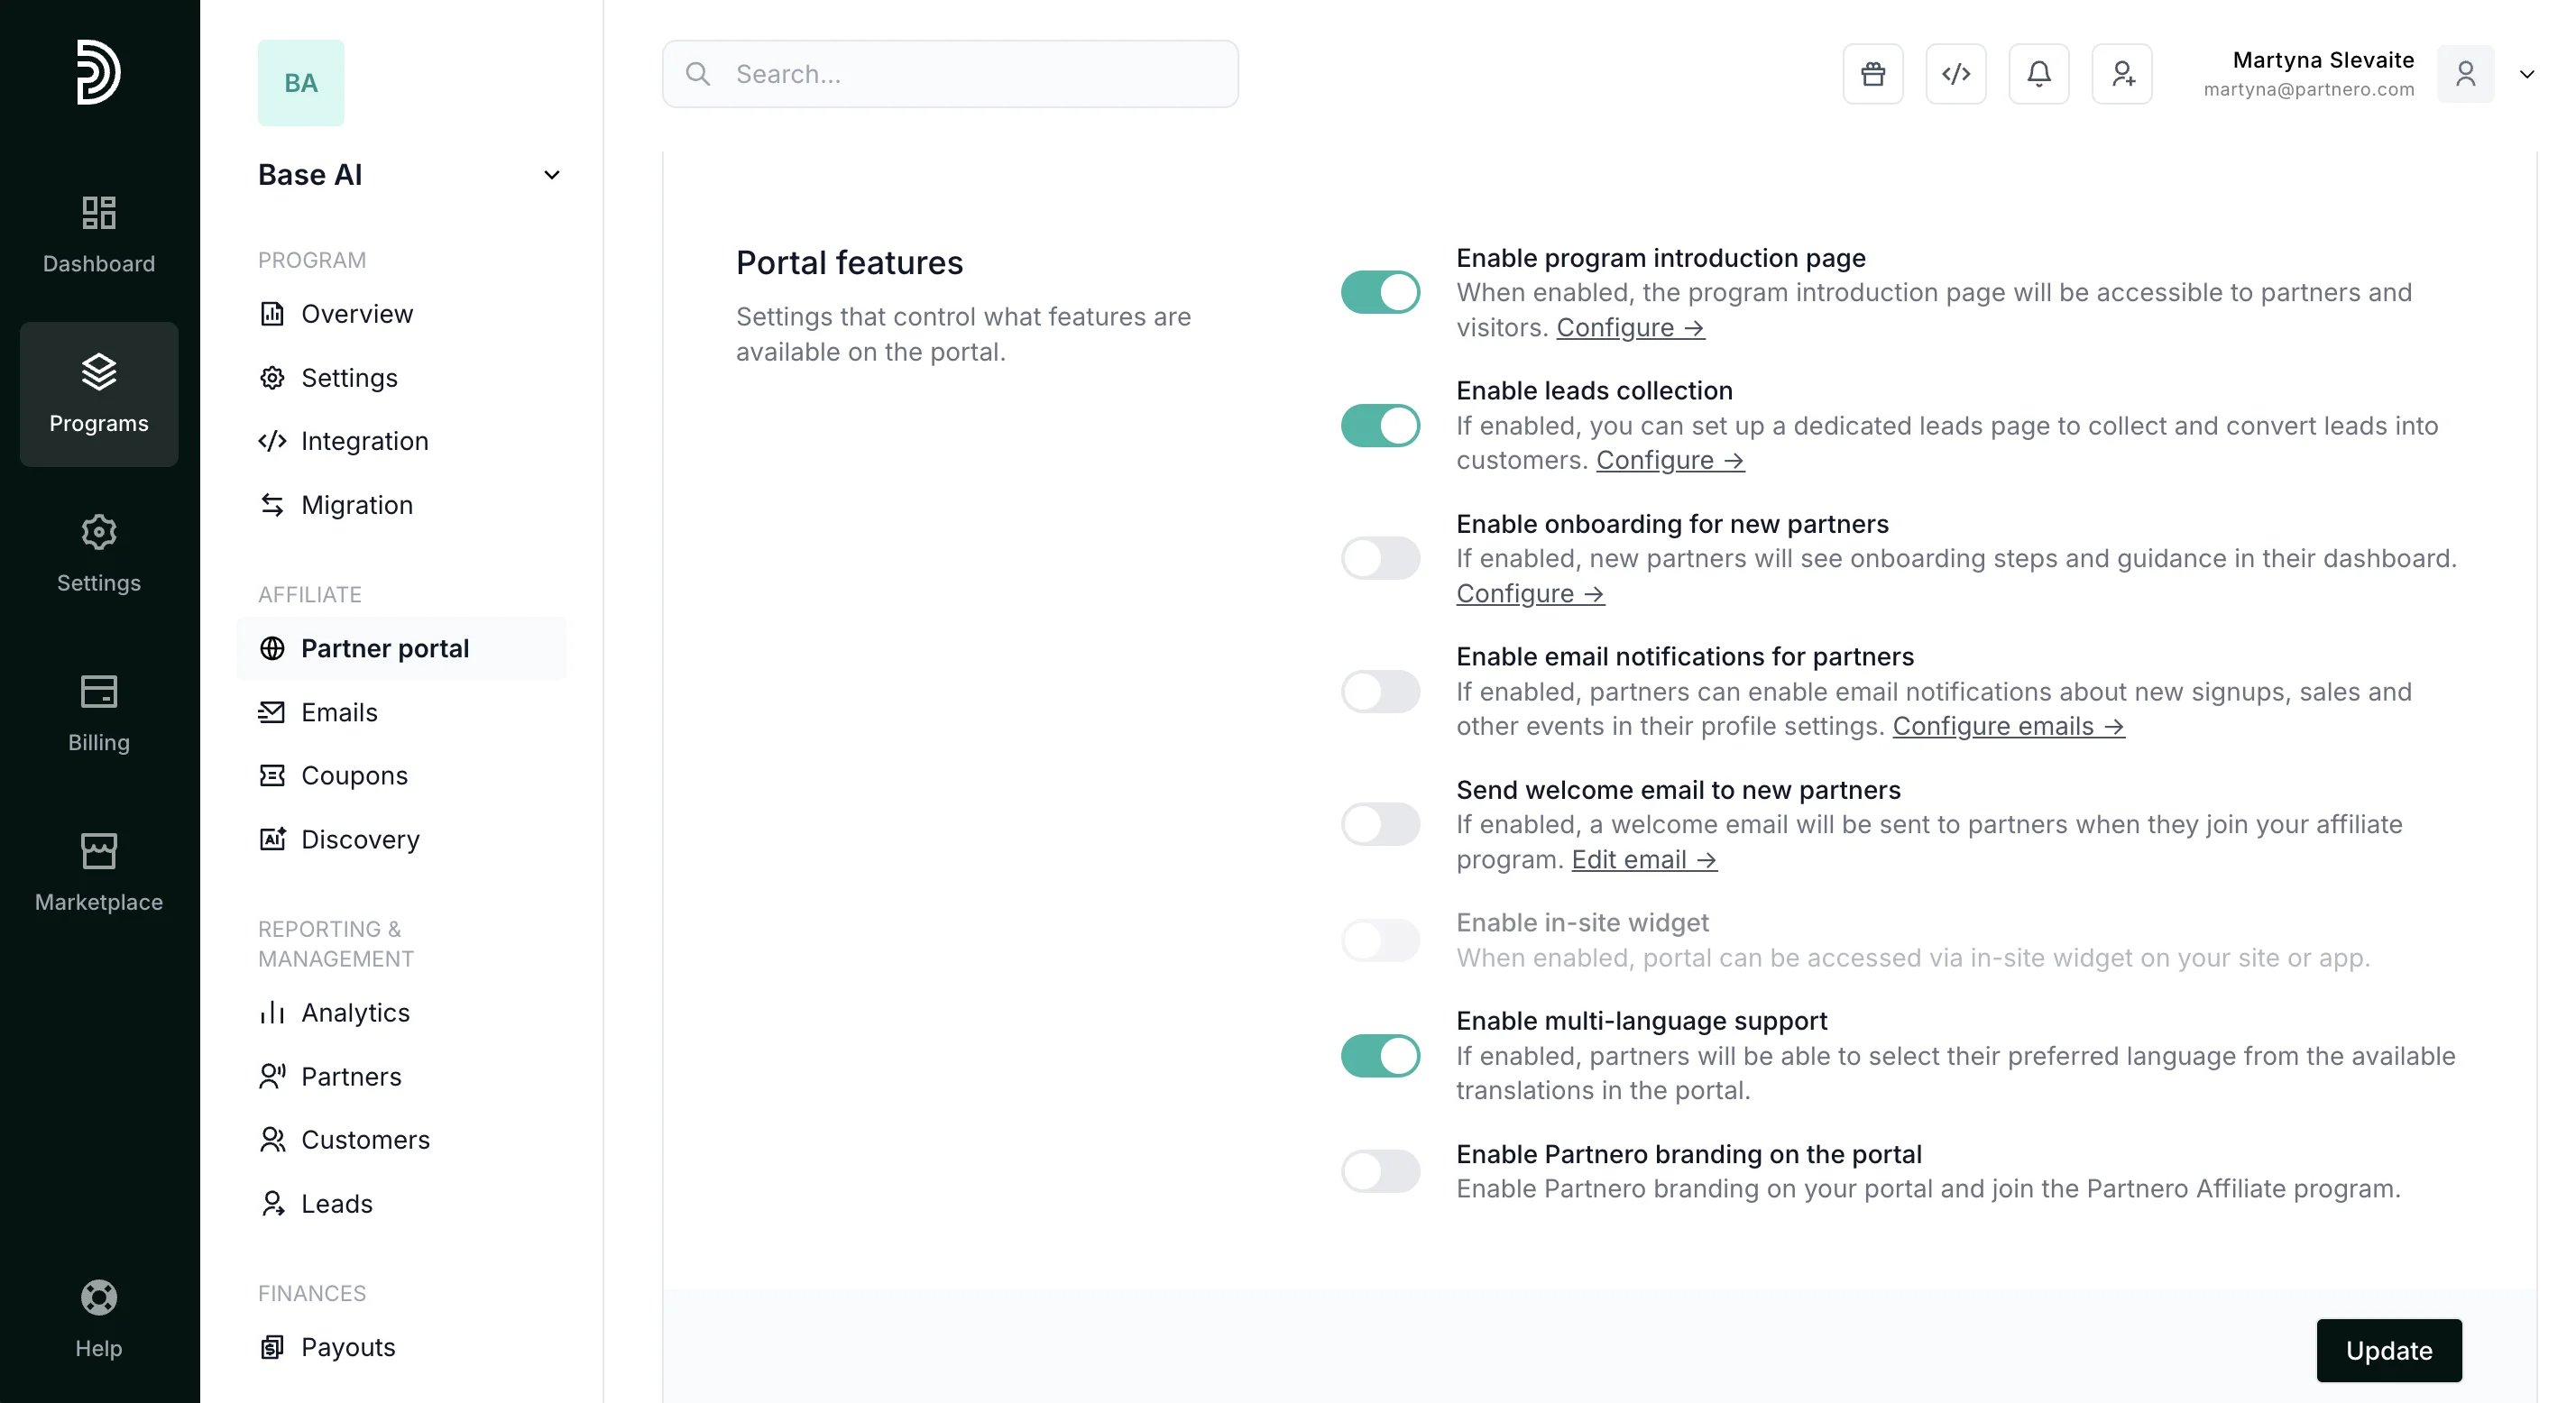 **
The following options are available:
* **Enable program introduction page**: if enabled, the program introduction page will be accessible to partners and visitors. [Read more](/knowledge-base/partner-portal/create-a-program-page).
* **Enable leads collection**: if enabled, you can set up a dedicated leads page to collect and convert leads into customers. [Read more](/knowledge-base/customers-leads/creating-a-lead-submission-page).
* **Enable onboarding for new partners**: if enabled, new partners will see onboarding steps and guidance in their dashboard. [Read more](/knowledge-base/partner-portal/new-partner-onboarding).
* **Enable email notifications for partners**: if enabled, partners can enable email notifications about new signups, sales, and other events in their profile settings. [Read more](/knowledge-base/program-emails/every-program-email-explained).
* **Send welcome email to new partners**: if enabled, a welcome email will be sent when partners join your affiliate program.
* **Enable in-site widget**: insert a widget on your website to access the partner portal. [Read more](/knowledge-base/partner-portal/in-site-widget-for-affiliate-programs).
* **Enable multi-language support**: if enabled, partners can select their preferred language from the available translations in the portal. [Read more](/knowledge-base/partner-portal/multi-language-support).
* **Enable Partnero branding on the portal**: Partnero branding on the portal will be generated with a unique link assigned to you. If anyone signs up and purchases a plan through that link, you'll get a commission.
Next, you'll find settings for **Partner permissions**:
**
The following options are available:
* **Enable program introduction page**: if enabled, the program introduction page will be accessible to partners and visitors. [Read more](/knowledge-base/partner-portal/create-a-program-page).
* **Enable leads collection**: if enabled, you can set up a dedicated leads page to collect and convert leads into customers. [Read more](/knowledge-base/customers-leads/creating-a-lead-submission-page).
* **Enable onboarding for new partners**: if enabled, new partners will see onboarding steps and guidance in their dashboard. [Read more](/knowledge-base/partner-portal/new-partner-onboarding).
* **Enable email notifications for partners**: if enabled, partners can enable email notifications about new signups, sales, and other events in their profile settings. [Read more](/knowledge-base/program-emails/every-program-email-explained).
* **Send welcome email to new partners**: if enabled, a welcome email will be sent when partners join your affiliate program.
* **Enable in-site widget**: insert a widget on your website to access the partner portal. [Read more](/knowledge-base/partner-portal/in-site-widget-for-affiliate-programs).
* **Enable multi-language support**: if enabled, partners can select their preferred language from the available translations in the portal. [Read more](/knowledge-base/partner-portal/multi-language-support).
* **Enable Partnero branding on the portal**: Partnero branding on the portal will be generated with a unique link assigned to you. If anyone signs up and purchases a plan through that link, you'll get a commission.
Next, you'll find settings for **Partner permissions**: 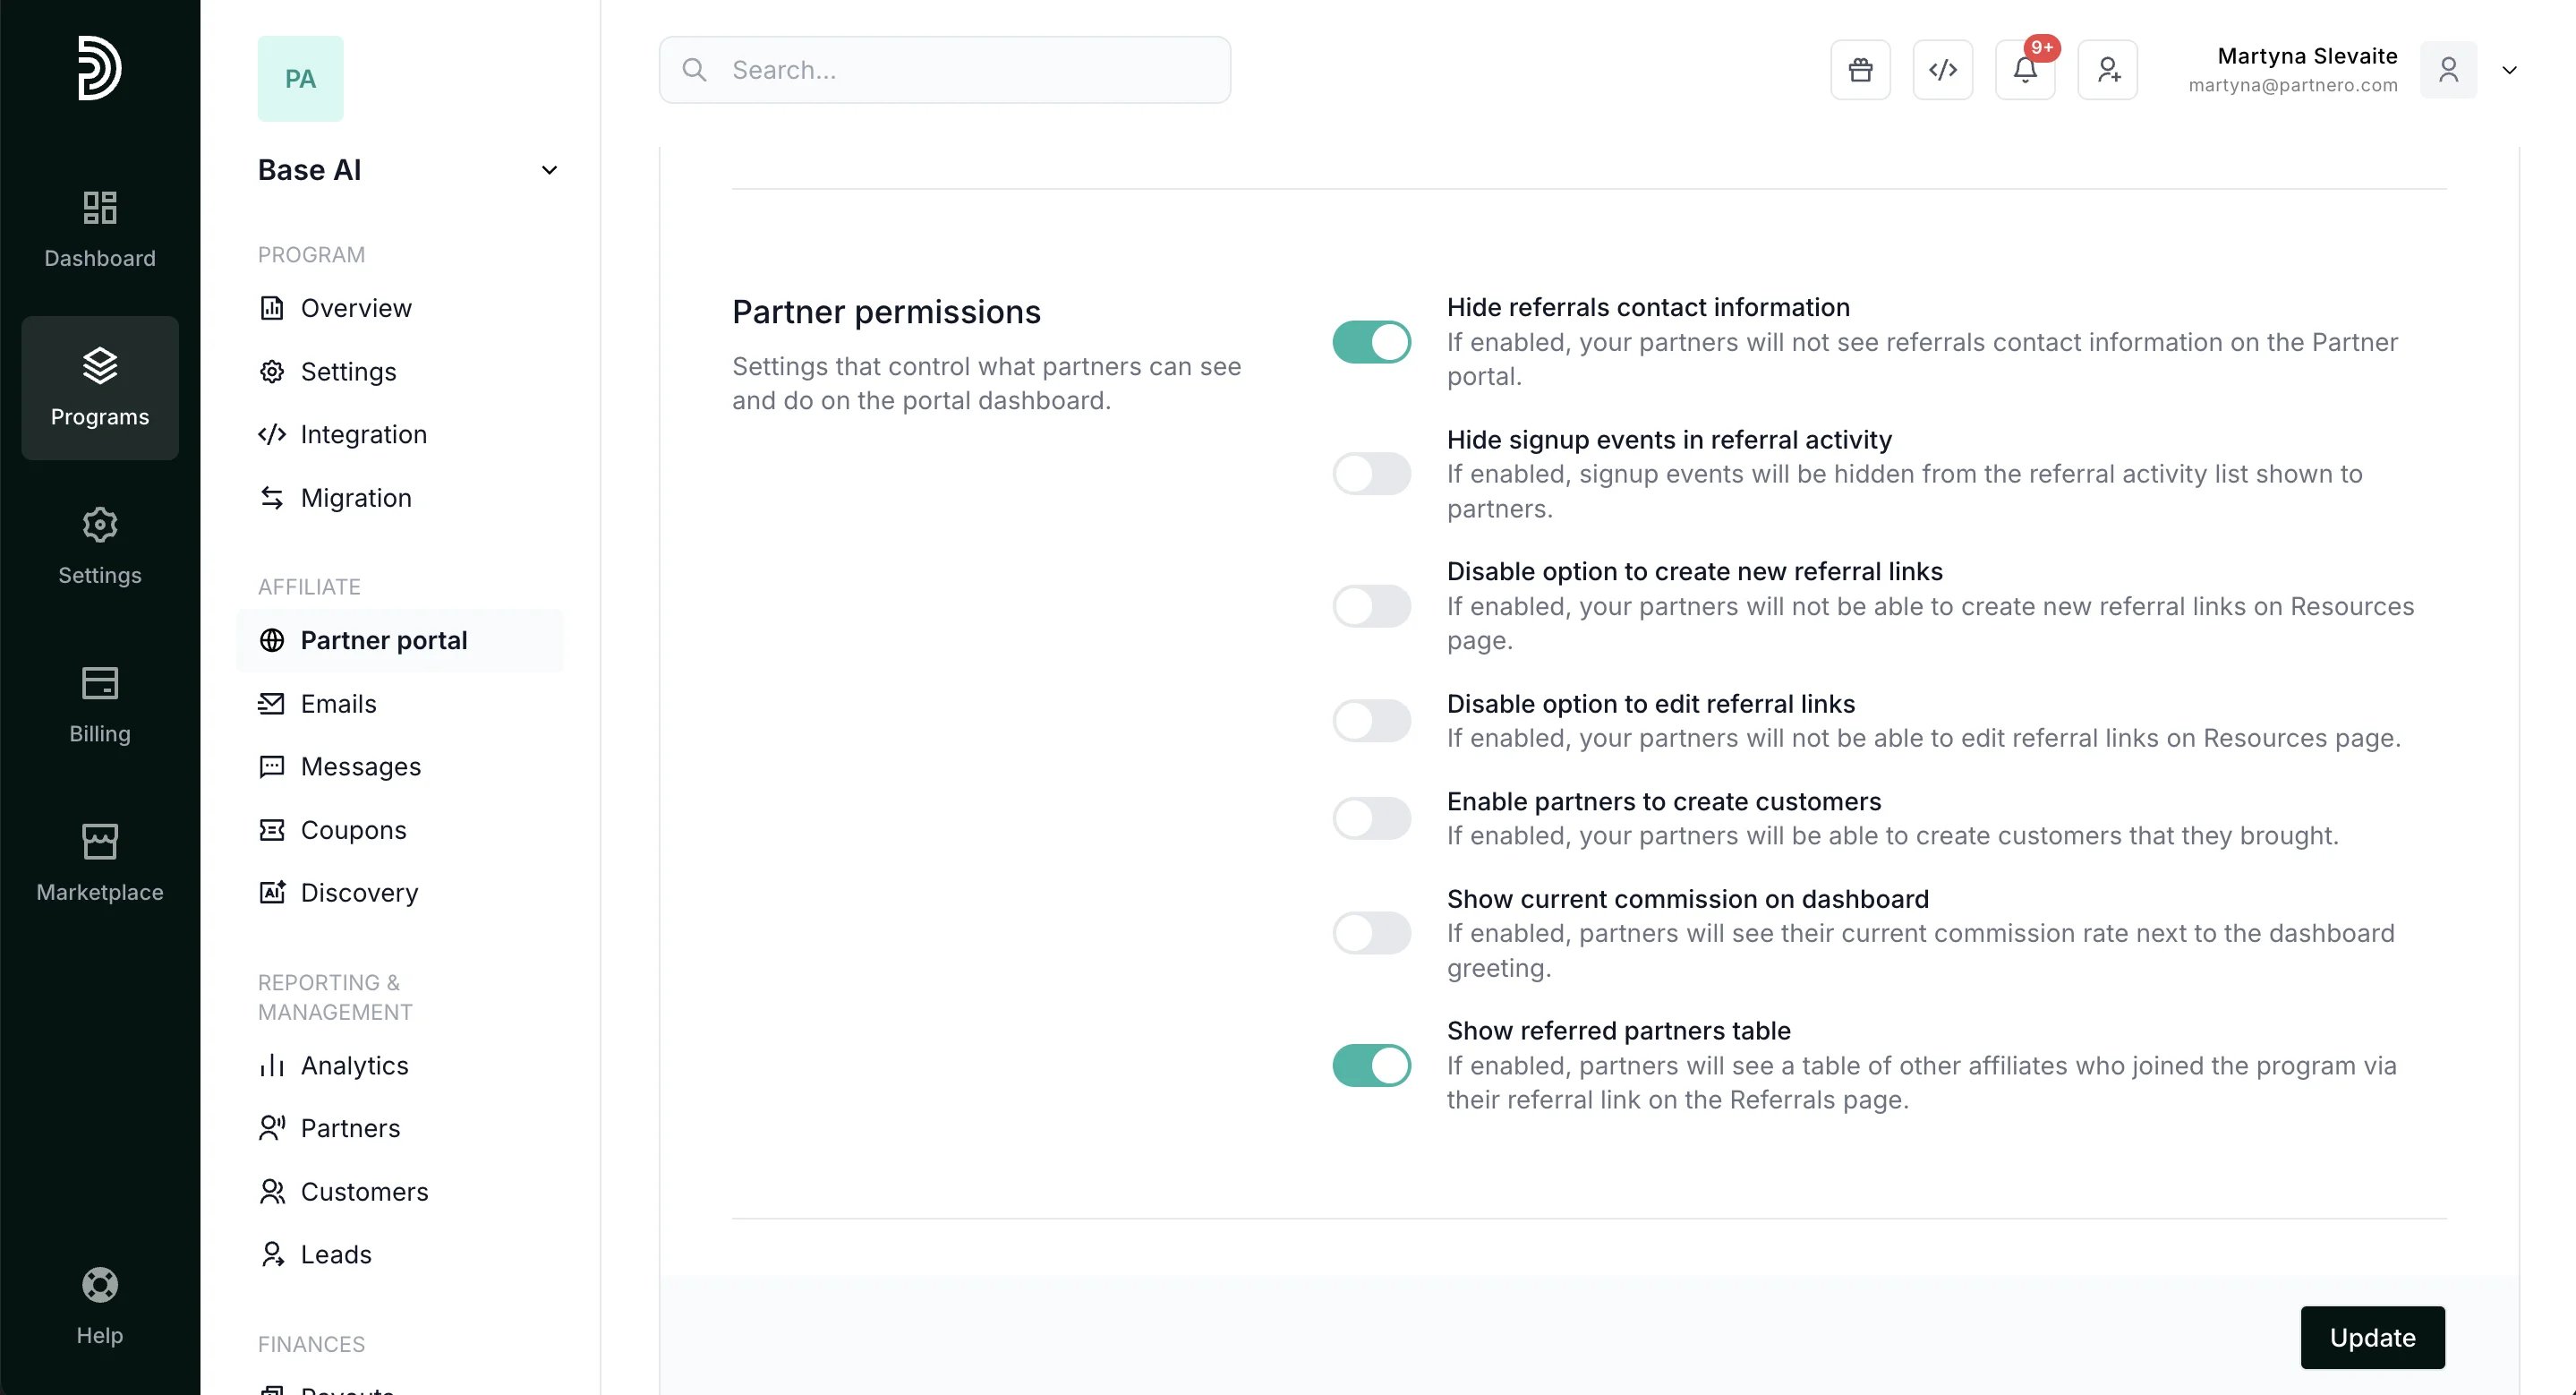 Here you can:
* **Hide referral contact information**: partners will not see referral contact information on their portal if enabled.
* **Hide signup events in referral activity**: if enabled, signup events will be hidden from referral activity.
* **Disable option to create new links**: if enabled, partners cannot create unique referral links in their Resources section.
* **Disable option to edit referral links**: if enabled, partners cannot edit the referral links in their Resources section.
* **Enable partners to create customers**: if enabled, partners can manually create customers they brought in. [Read more](/knowledge-base/partner-portal/allow-partners-to-create-customers-manually).
* **Show current commission on dashboard**: if enabled, partners will see their commission rate next to the dashboard greeting:
Here you can:
* **Hide referral contact information**: partners will not see referral contact information on their portal if enabled.
* **Hide signup events in referral activity**: if enabled, signup events will be hidden from referral activity.
* **Disable option to create new links**: if enabled, partners cannot create unique referral links in their Resources section.
* **Disable option to edit referral links**: if enabled, partners cannot edit the referral links in their Resources section.
* **Enable partners to create customers**: if enabled, partners can manually create customers they brought in. [Read more](/knowledge-base/partner-portal/allow-partners-to-create-customers-manually).
* **Show current commission on dashboard**: if enabled, partners will see their commission rate next to the dashboard greeting: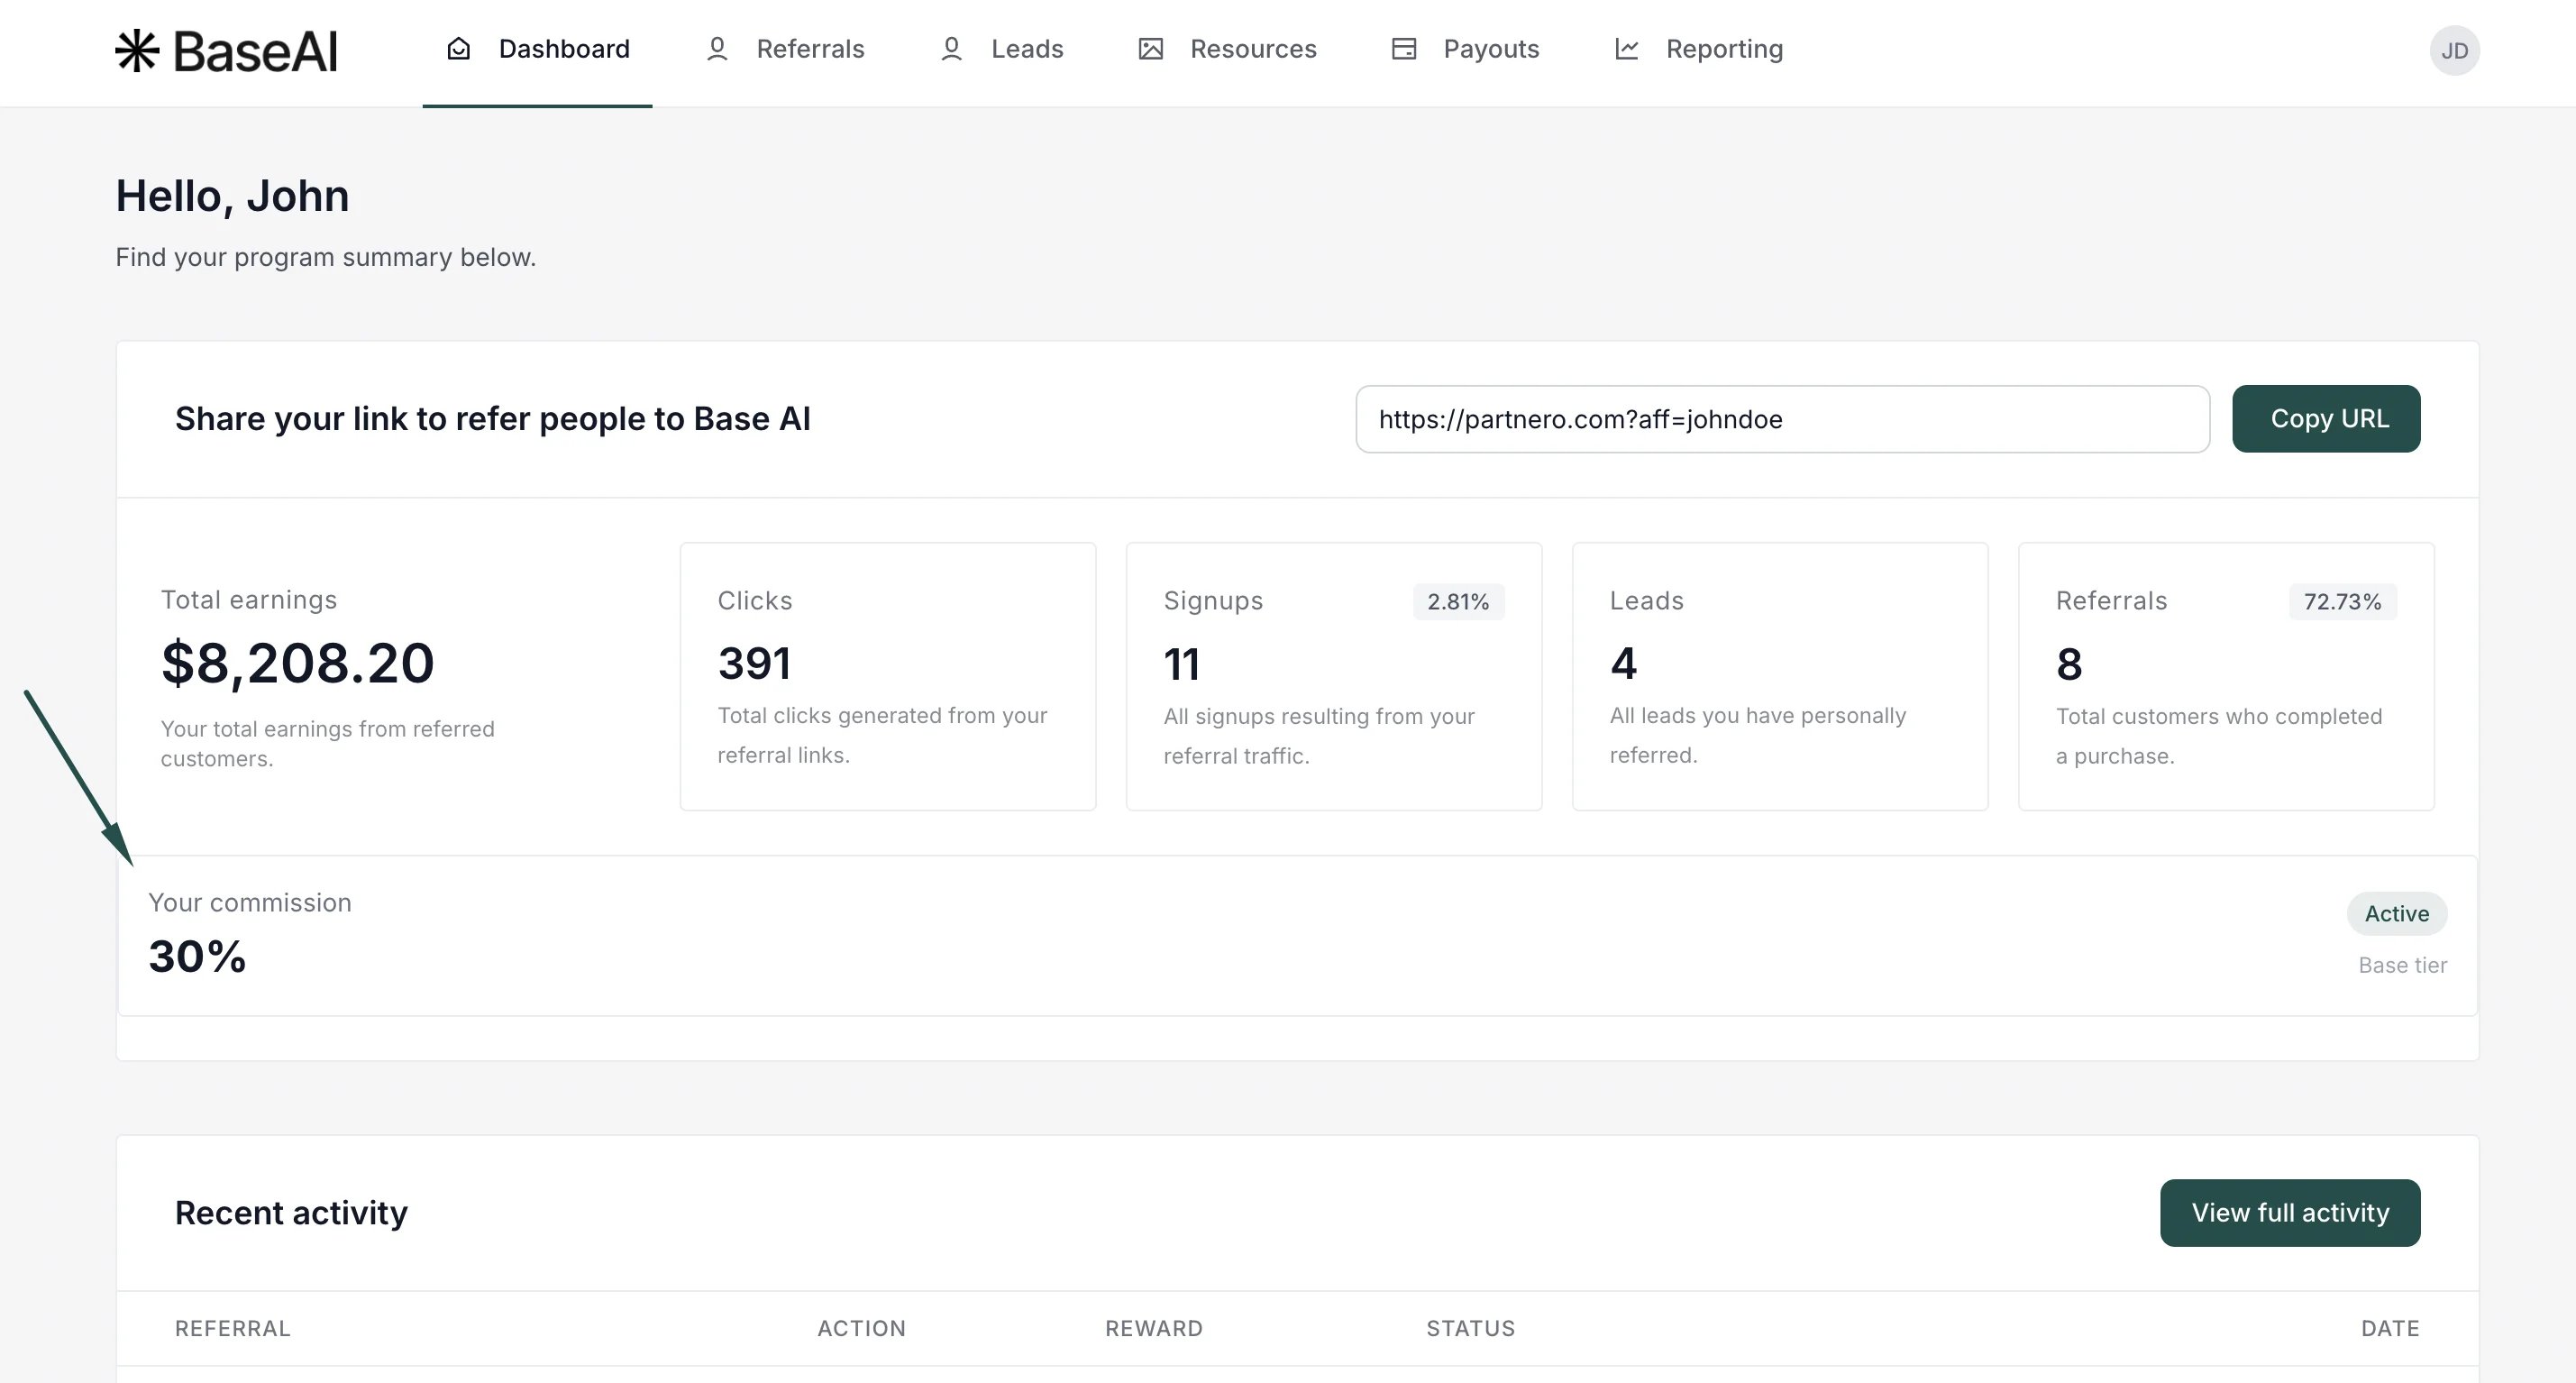 * **Disable link tracking options**: If enabled, partners will not see referral link sharing, clicks, and signups tracking on the dashboard, reporting page, and referral links on the resources page.
* **Show referred partners table**: If enabled, partners will see a table of other affiliates who joined the program via their referral link on the Referrals page. *Note:* *This setting is only available if* *[multi-level commissions](/knowledge-base/commissions-rewards/multi-tier-commission) are enabled and configured.*
The last section is **Contact information**:
* **Disable link tracking options**: If enabled, partners will not see referral link sharing, clicks, and signups tracking on the dashboard, reporting page, and referral links on the resources page.
* **Show referred partners table**: If enabled, partners will see a table of other affiliates who joined the program via their referral link on the Referrals page. *Note:* *This setting is only available if* *[multi-level commissions](/knowledge-base/commissions-rewards/multi-tier-commission) are enabled and configured.*
The last section is **Contact information**:
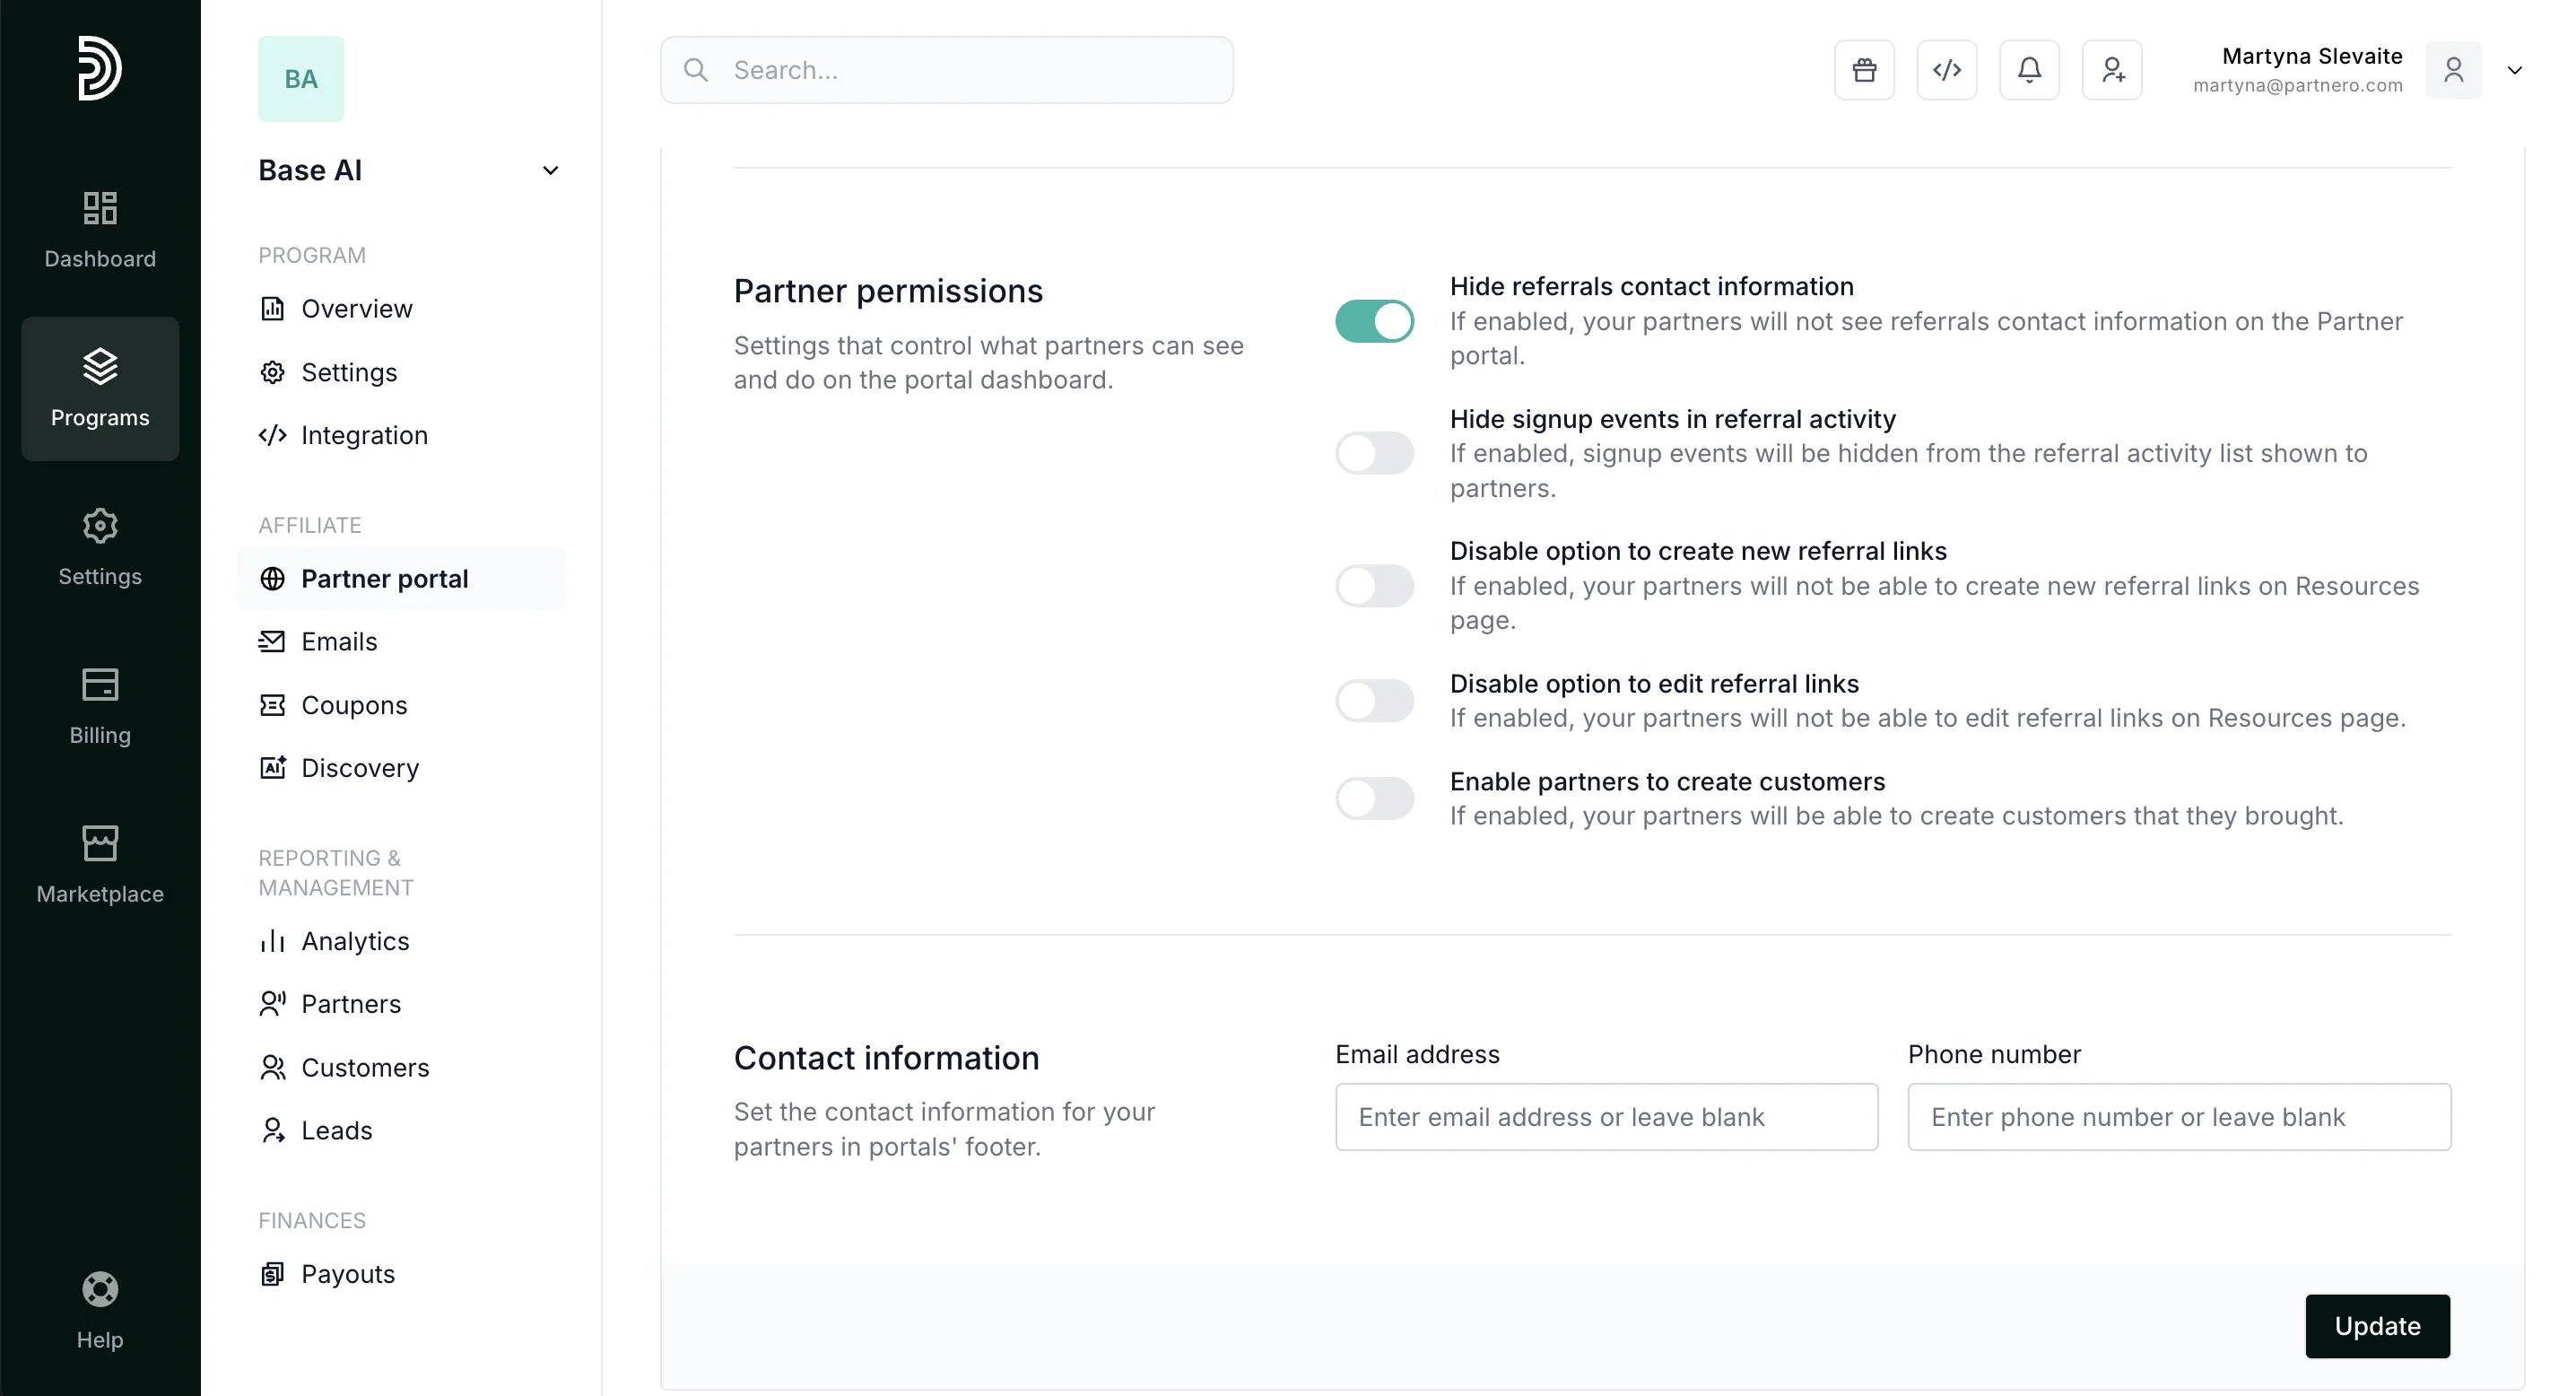 Here you can set the contact information for your partners in the portal's footer.
***
### 2. Custom
Here you can set the contact information for your partners in the portal's footer.
***
### 2. Custom
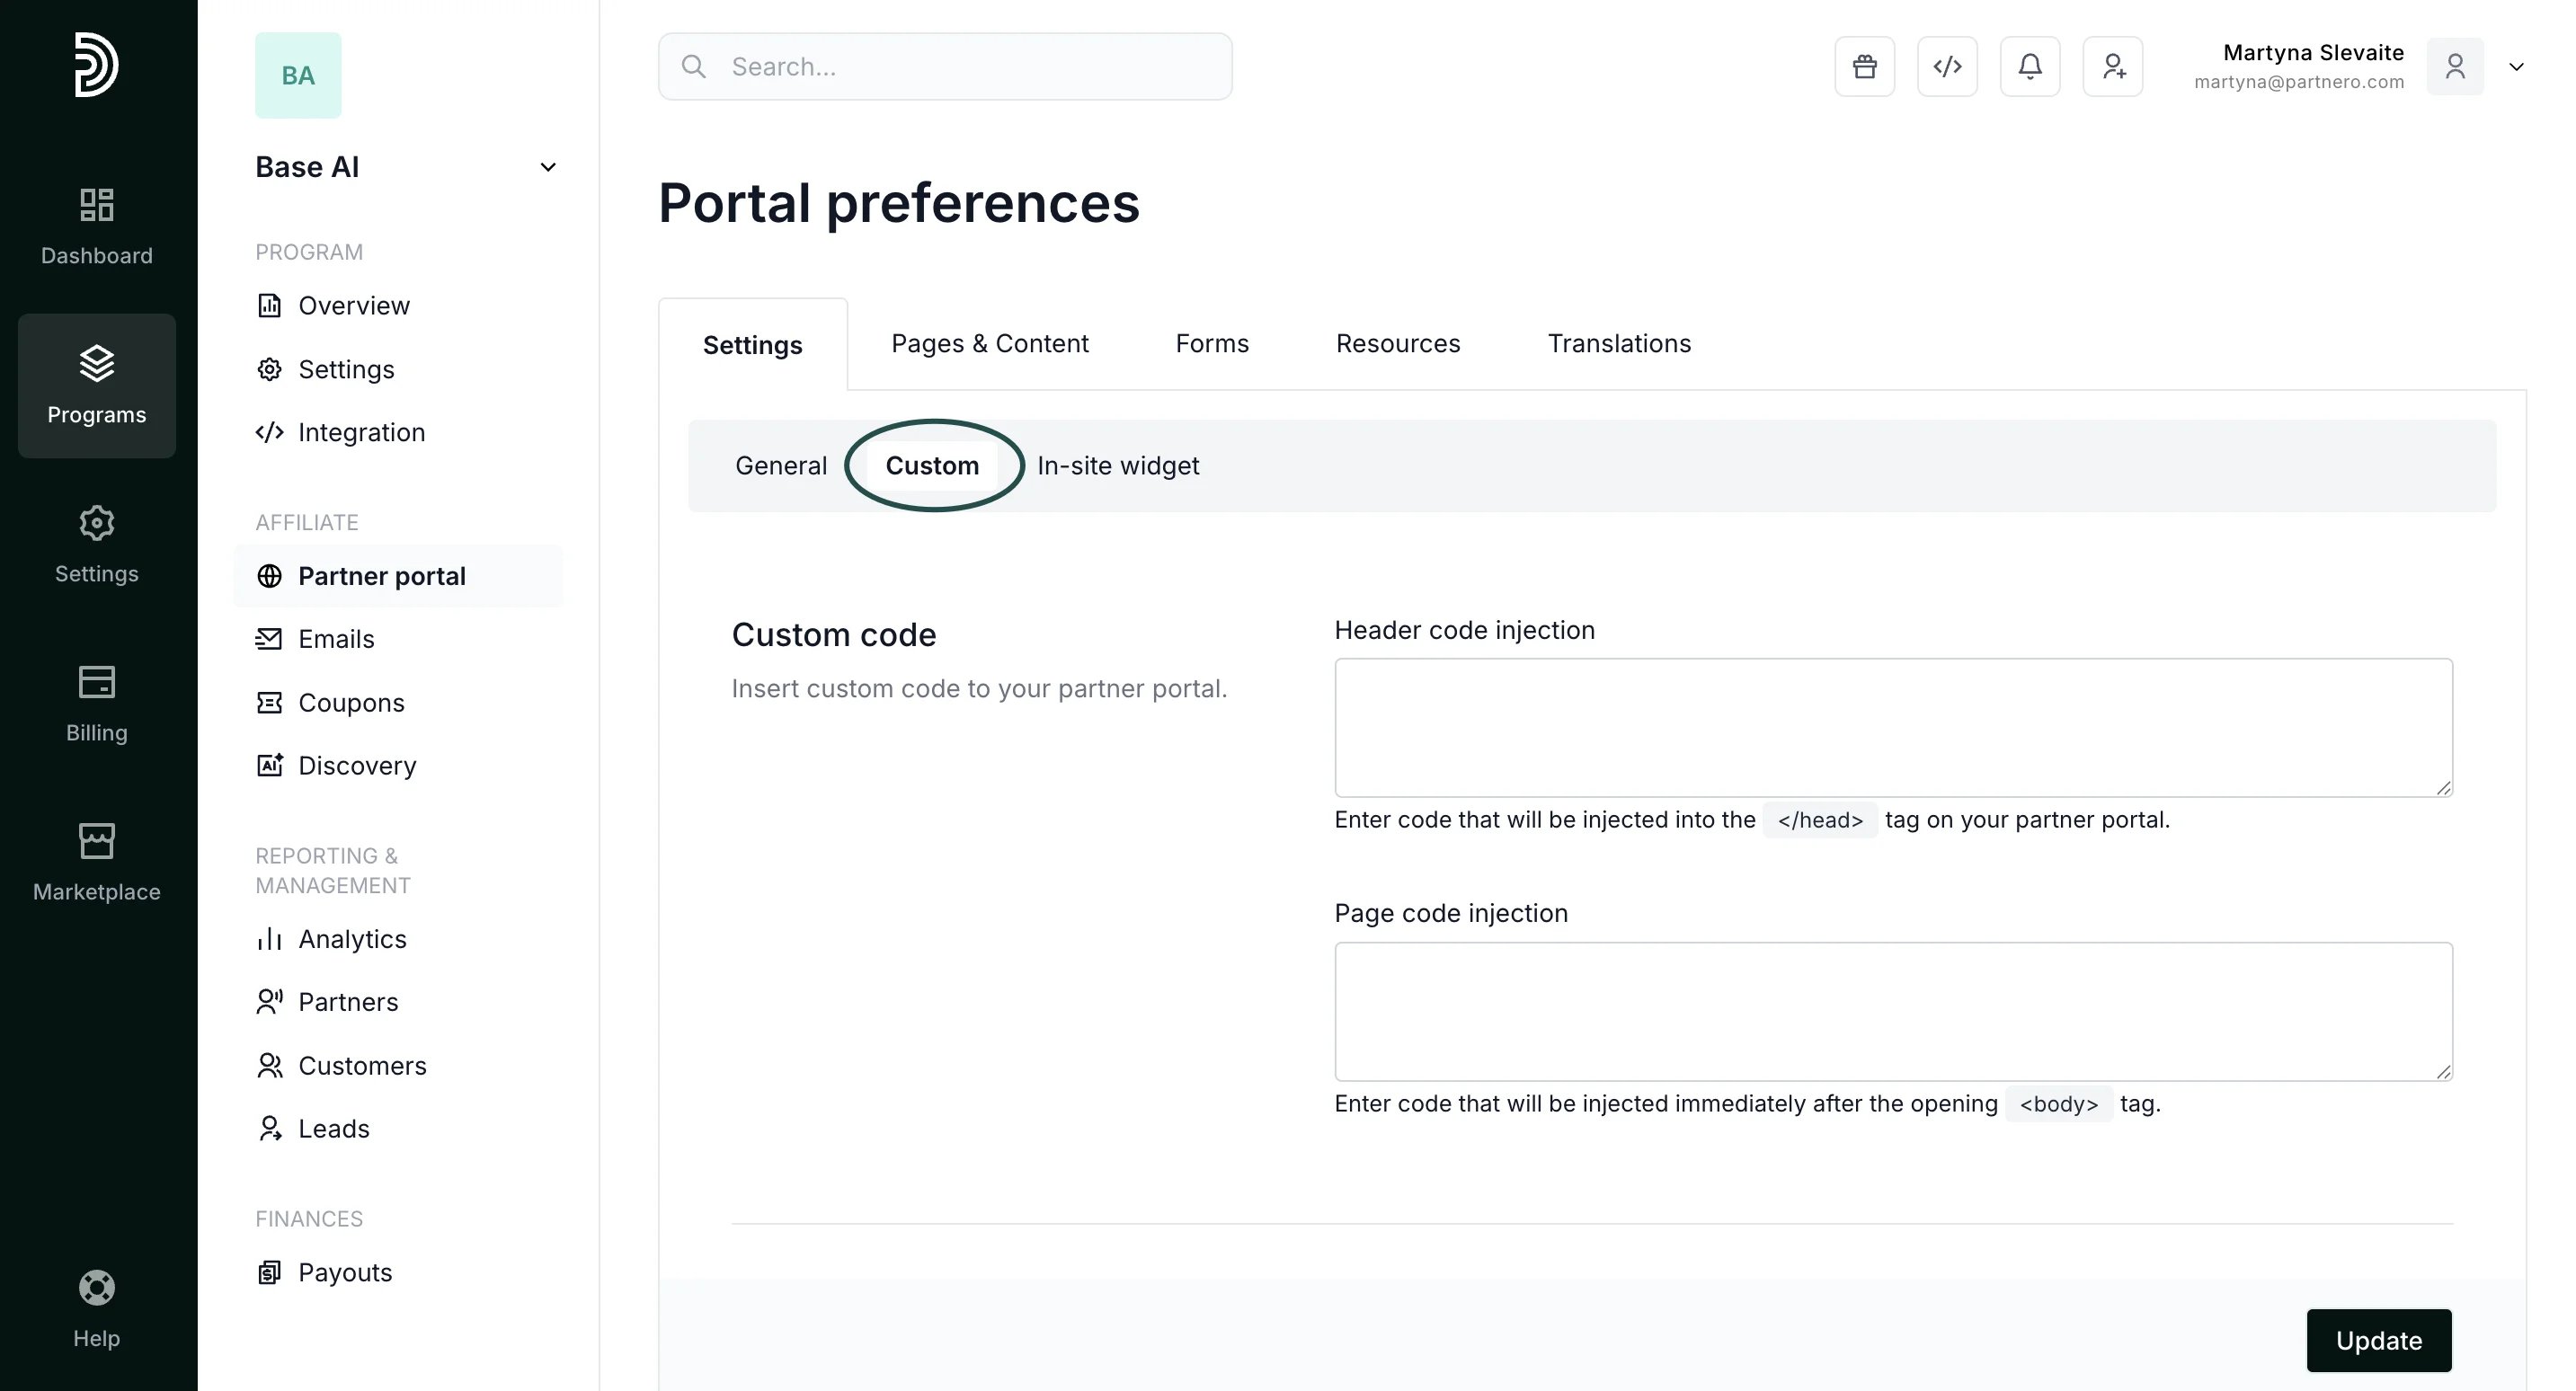 Here you'll find the following:
**Custom code**: Insert custom code into the \ or the \ of the partner portal.
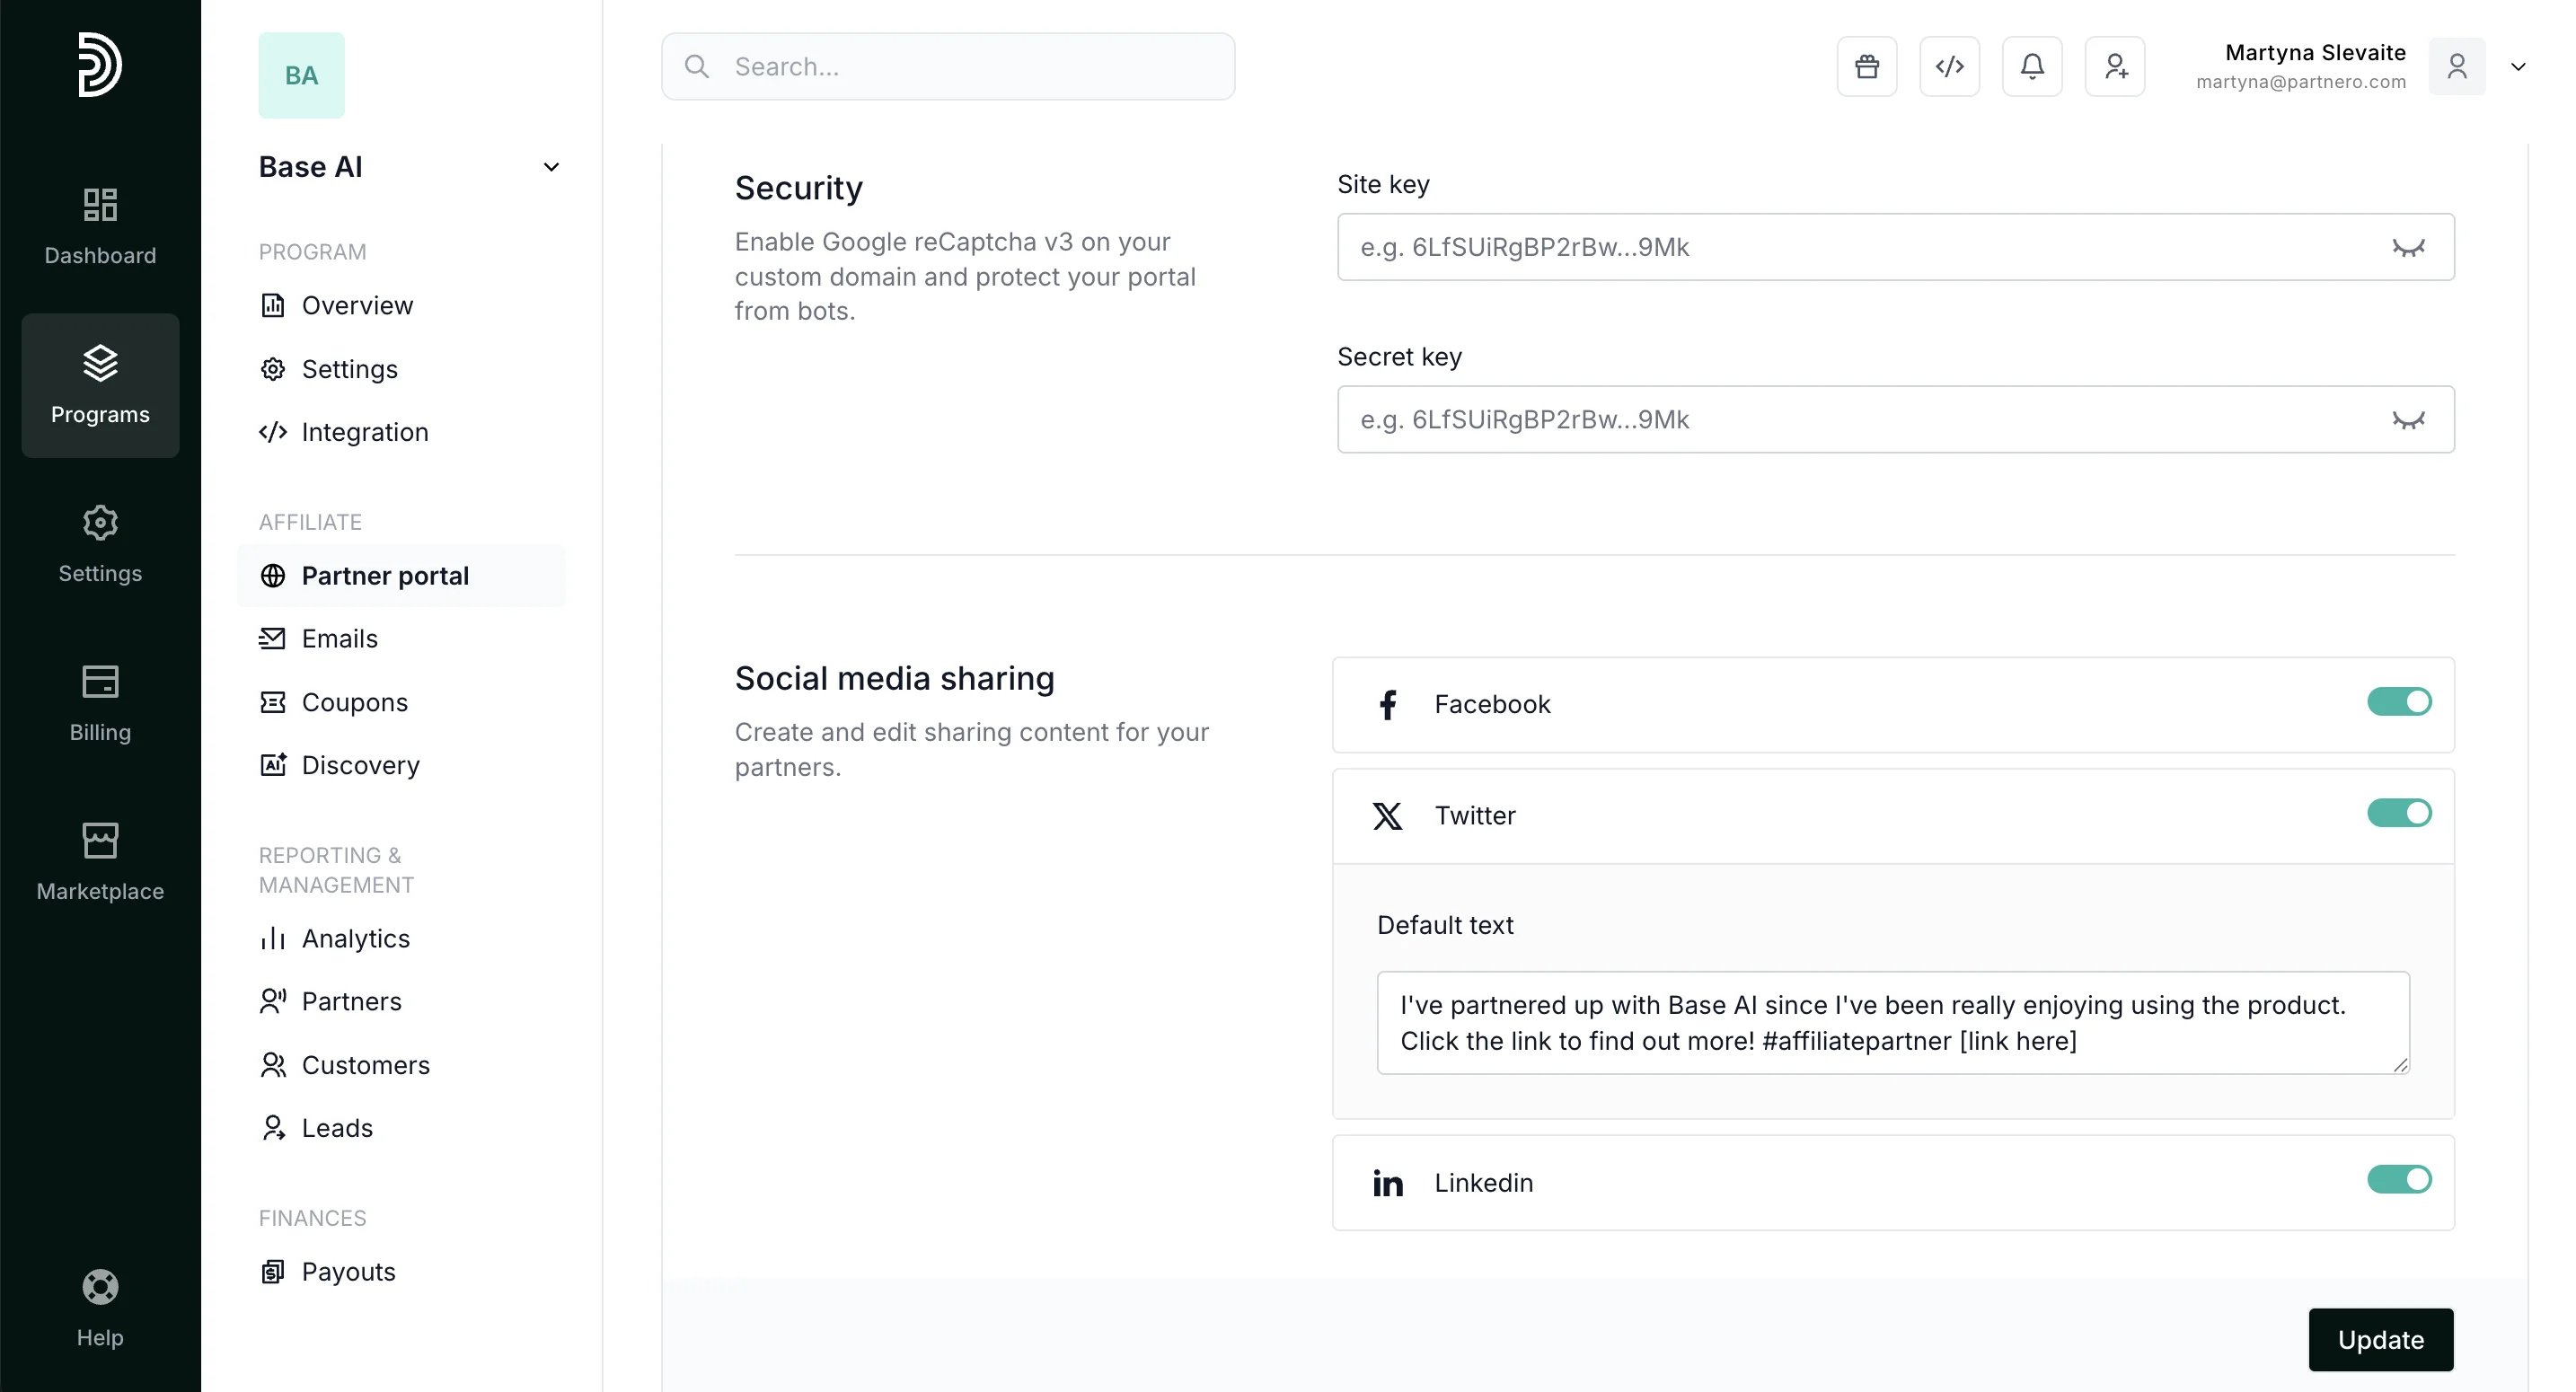
**Security:** Enable Google reCAPTCHA V3. [Read more](/knowledge-base/partner-portal/enable-google-recaptcha-for-partner-portal).
**Social media sharing**: enable social media sharing and customize the default messages. [Read more](/knowledge-base/partner-portal/enable-and-edit-social-media-sharing-messages).
Here you'll find the following:
**Custom code**: Insert custom code into the \ or the \ of the partner portal.
**Security:** Enable Google reCAPTCHA V3. [Read more](/knowledge-base/partner-portal/enable-google-recaptcha-for-partner-portal).
**Social media sharing**: enable social media sharing and customize the default messages. [Read more](/knowledge-base/partner-portal/enable-and-edit-social-media-sharing-messages).
 ***
### 3. In-site widget
***
### 3. In-site widget
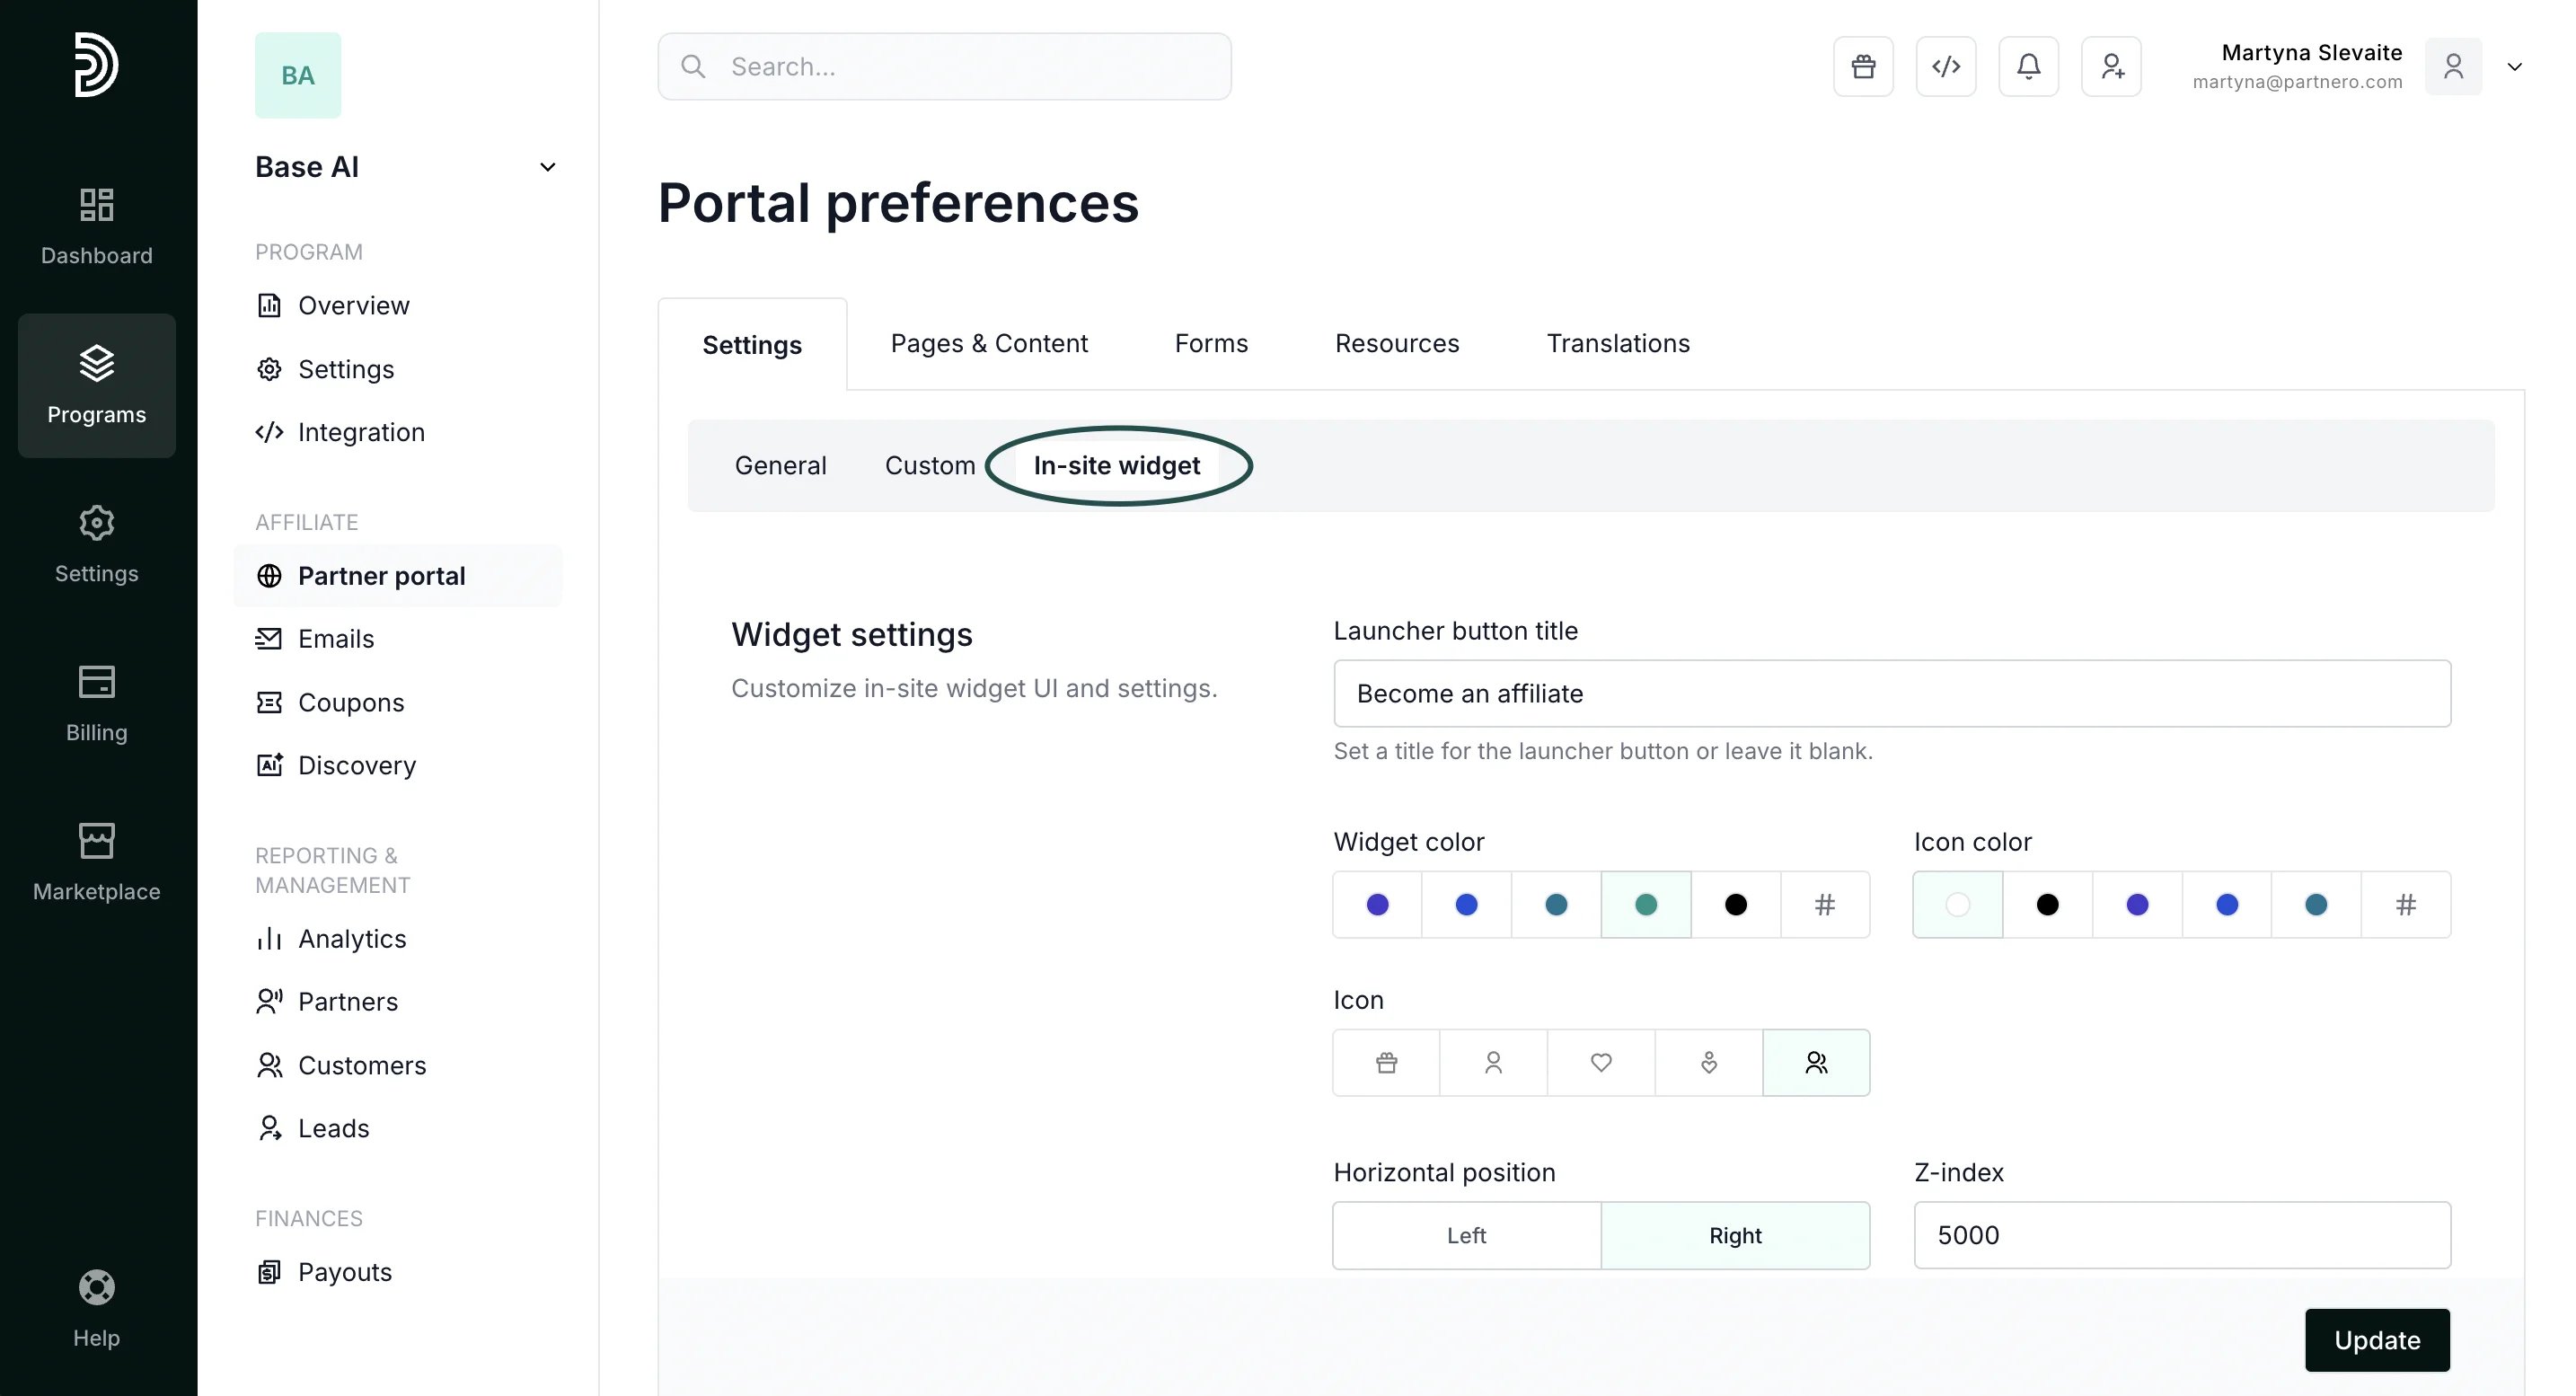 The final section on the Settings tab is where you can customize the in-site widget by adding a button title, and selecting the colors and positions. [Read more](/knowledge-base/partner-portal/in-site-widget-for-affiliate-programs).
Don't forget to click **Update** after you make any changes!
This documentation is built and hosted on [Mintlify](https://mintlify.com), a developer documentation platform.
The final section on the Settings tab is where you can customize the in-site widget by adding a button title, and selecting the colors and positions. [Read more](/knowledge-base/partner-portal/in-site-widget-for-affiliate-programs).
Don't forget to click **Update** after you make any changes!
This documentation is built and hosted on [Mintlify](https://mintlify.com), a developer documentation platform.